
Regarding your AI vibes... no... i'm just dumb and forgot the images
And regarding 1024x1024... yes you're right, i meant it as a follow up tutorial so whomever is following it up could leave it as default and not have too many worries. But working in 2048 or 4096 is objectively better. BTW you can just write *4 next to the number and blender calculates it automatically.
That seems very useful, it gives me some ideas for future skins.
While i'm at it, another thing you can do in Blender is baking the Ambient Occlusion. Could prove useful if you're making the interior of some mods.
This means, connect some stuff. And you have a procedural dirt skin.
Last edited by neuroticat, .
Seems like someone has embraced this method, nice to see! This text gives me so AI vibes though and I found one issue so far, you should definetly not use 1024x1024 as your texture size. LFS has locally supported 4096x4096 as texture size for many years now and you should definetly use that. Looks much nicer. LFSW still only supports 2048x2048. I still havn't tried the decal placing described above, but just reading it, it still seems easier to do that in photoshop, I'll give it a try though.
While we are on the topic of sharing tips on how to skin using this method I'm going to share how to make the skin symmetrical and mirror it along the center of the car.
Add a node setup like this between your texture coordinate and mapping node:
FOR OBJECT COORDINATE (Recommended):
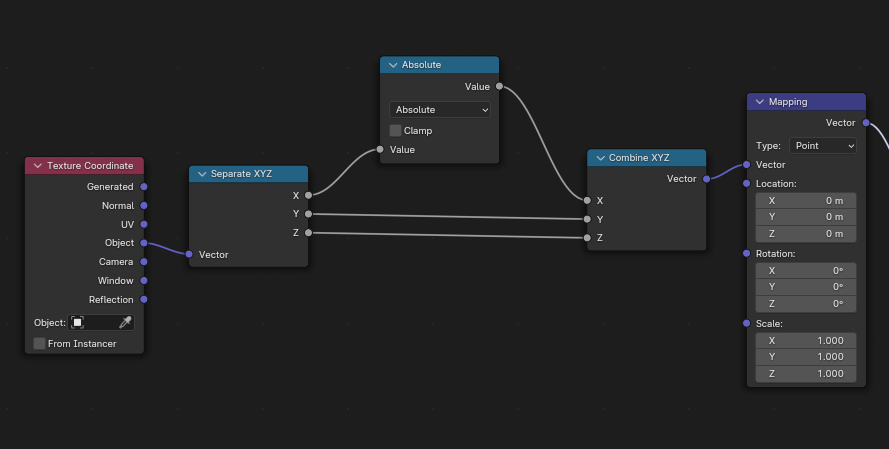
For generated coordinates:
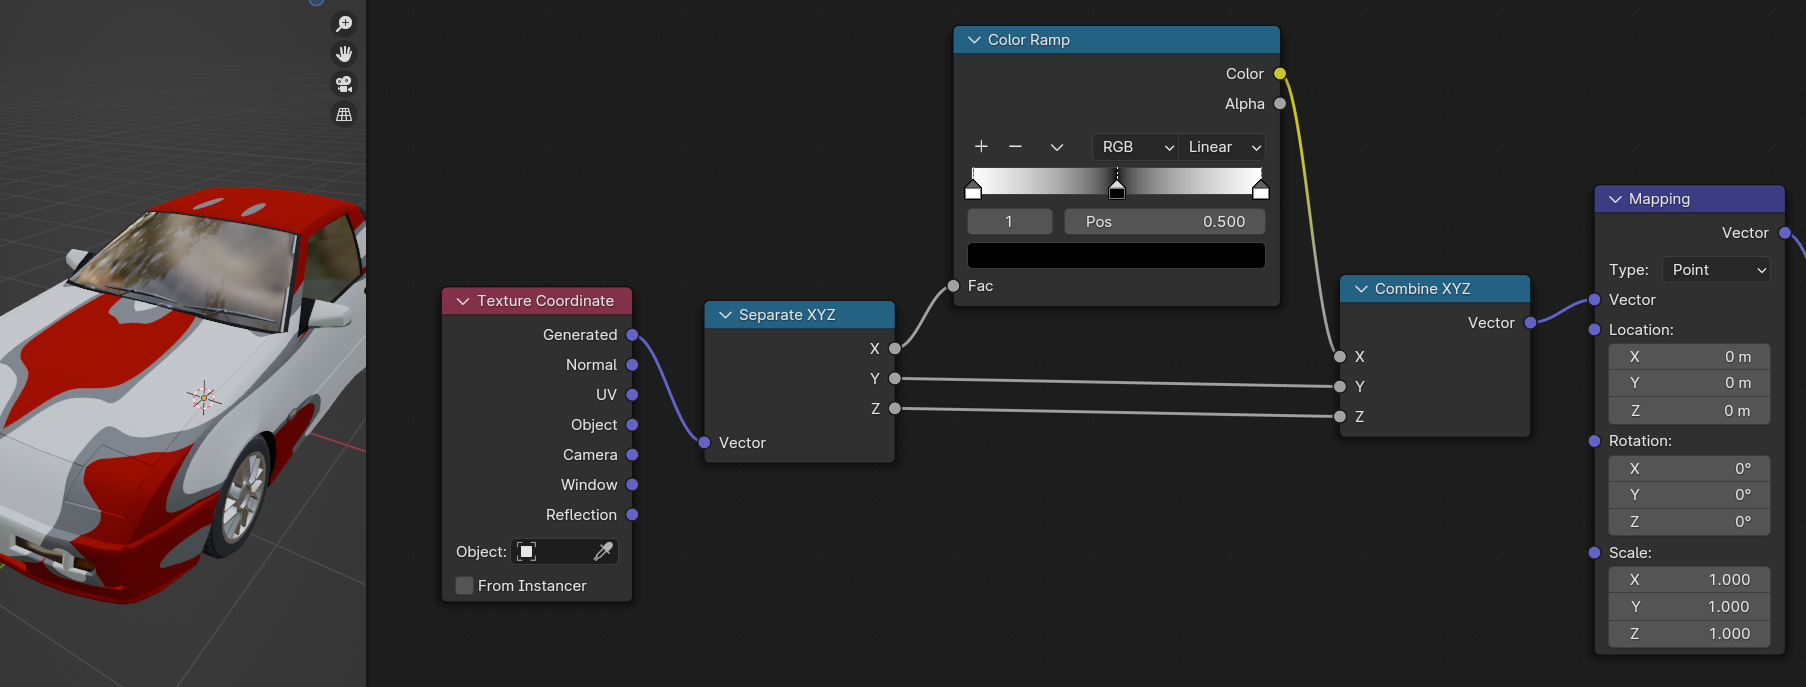
This will make all textures that has this mapping mirrored along the center.
While we are on the topic of sharing tips on how to skin using this method I'm going to share how to make the skin symmetrical and mirror it along the center of the car.
Add a node setup like this between your texture coordinate and mapping node:
FOR OBJECT COORDINATE (Recommended):
For generated coordinates:
This will make all textures that has this mapping mirrored along the center.
Last edited by ClasK_03, .
Advanced skin making with Blender
I decided to release the secret of the milanesa, a little how-to on some results you can accomplish with Blender. You're gonna need these models:
https://www.lfs.net/forum/thread/95307-NEW-Blend-and-OBJ-Files-for-All-LFS-Cars-Updated-v1-2%21
Also there's a video and a post that goes onto some of the stuff i'm doing, credit where credit is due:
https://www.youtube.com/watch?v=HkRlqbFo0SA
https://www.lfs.net/forum/thread/95303-Tutorial%3A-Procedural-skins-using-Blender%21
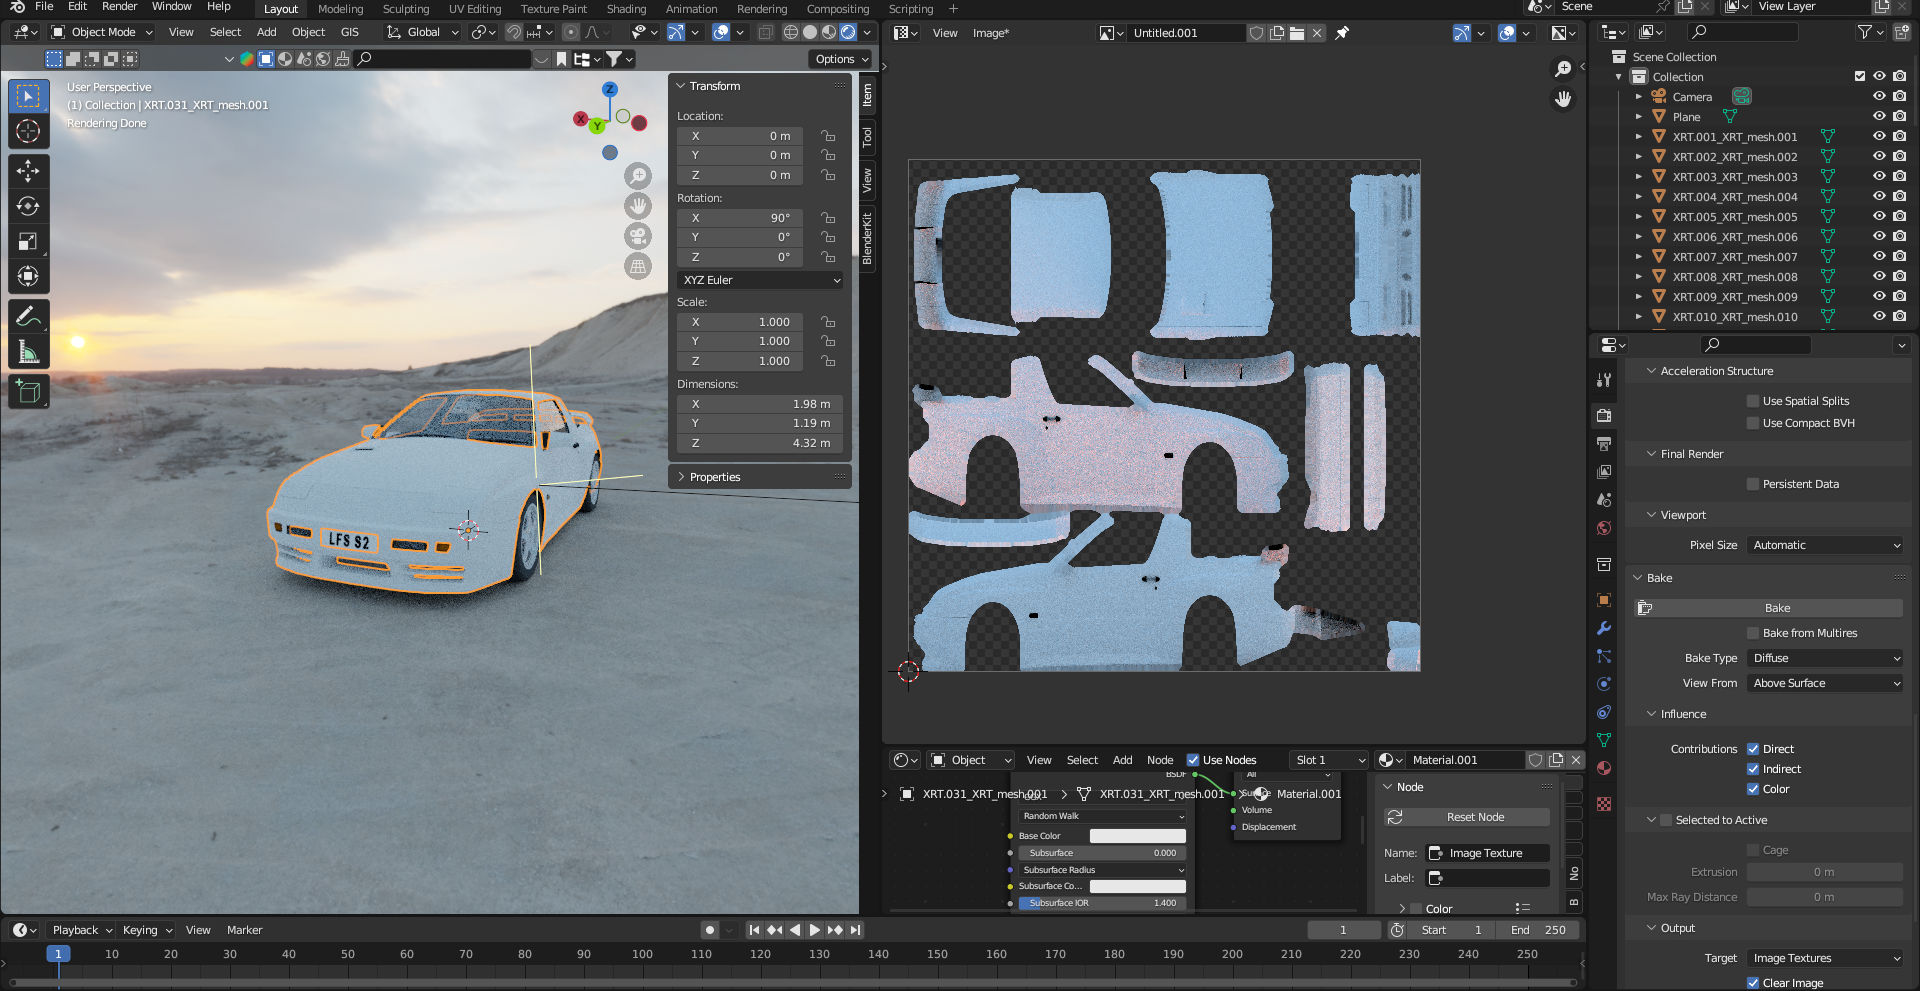
First and foremost, Blender has a feature which lets you bake textures. Meaning you can make a procedural skin and bake it into an image. This allows you to have a seamless, form fitting texture that you can apply to a multitude of cars.
To make it you will need to have enabled Cycles as a Render Engine (In Render Properties, the camera icon in the lateral bar) Then the Bake section, put Bake Type in Diffuse and check "Color". You don't need Indirect and Direct, but if you want to you can enable them and put an HDRI image for light. This will give you a texture which has shadows and ambient colors, which would look good if the same enviroment aligns in LFS. It wont.
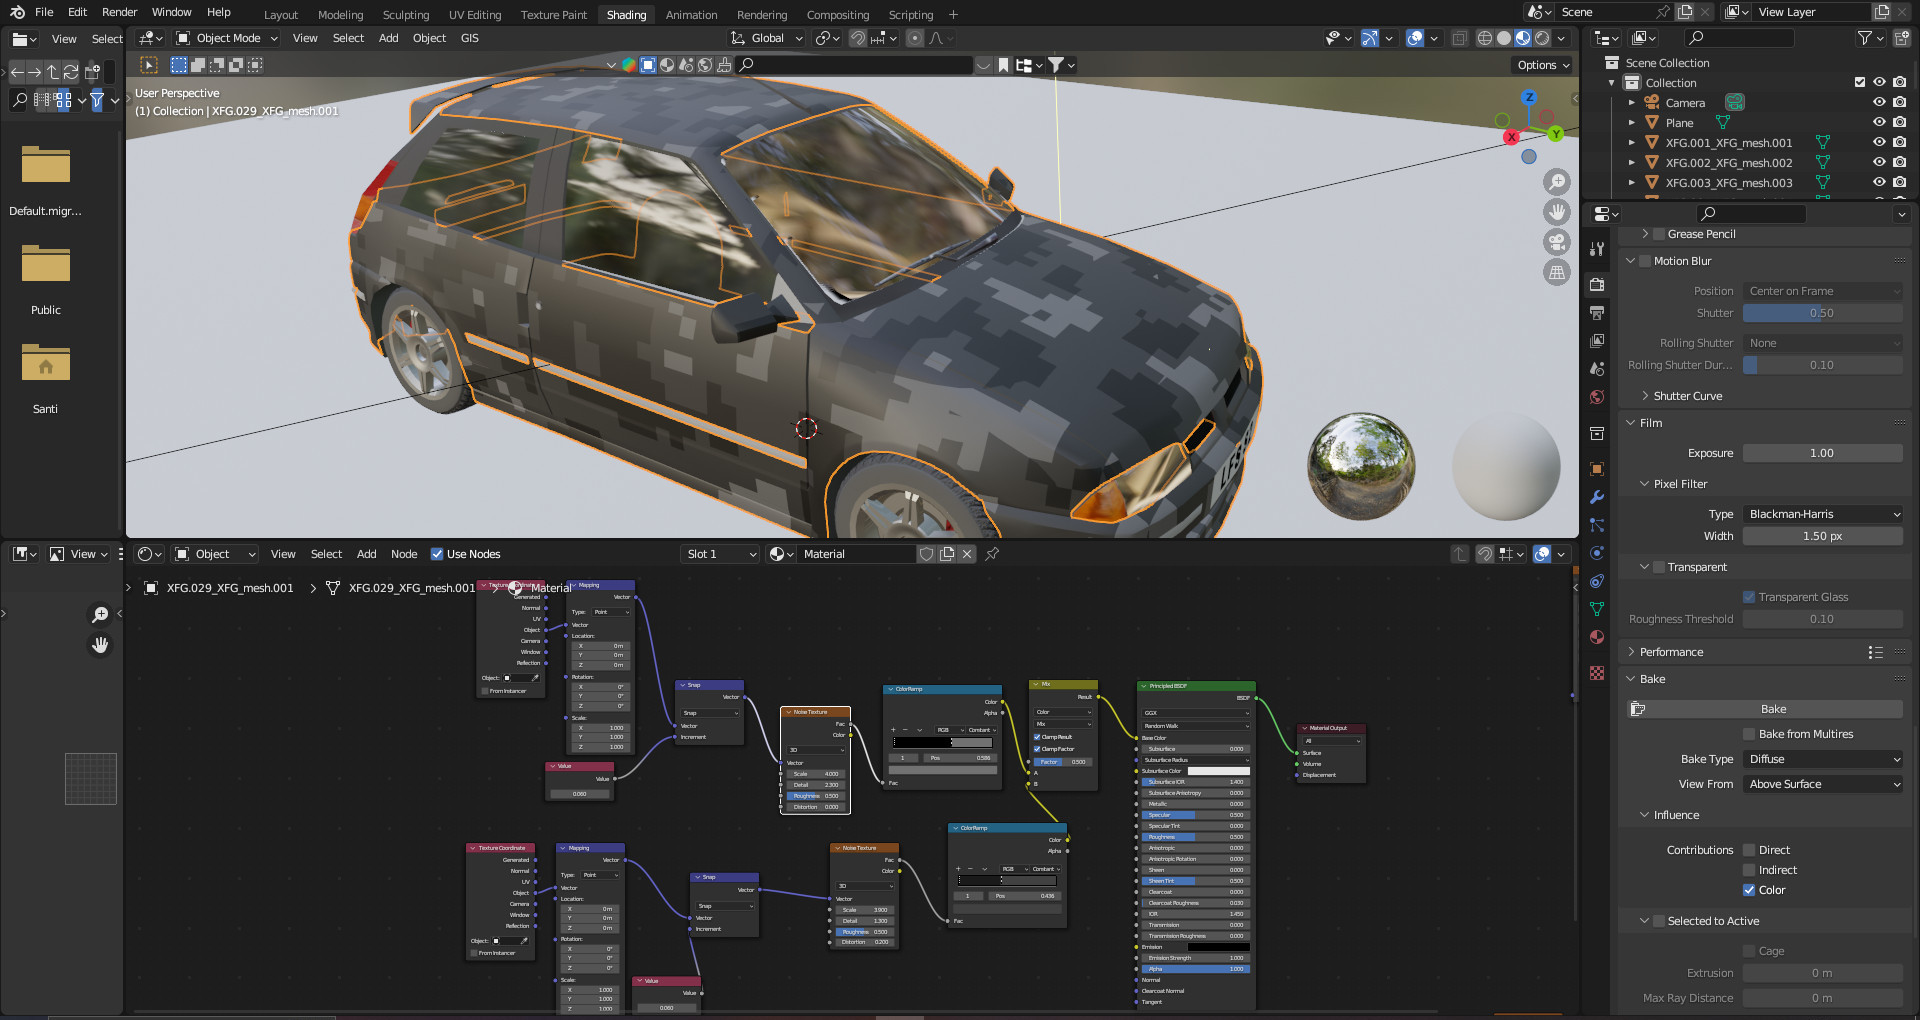
Now, let's say you want for example, a camo skin. Go to the Shader Editor (or Shading tab at the upper bar) and add a Noise Texture, a ColorRamp and connect this to the base color. Change the Noise Texture from Linear to Constant and move the arrow to the middle, if you select the arrow and click it's color at the bottom it allows you to change it. It does look wonky though, to fix it add a Texture Coordinate and a Mapping (in that order) or press Ctrl+T if you have Node Wrangler enabled. Play with the values until it looks good, i recommend having a reference picture to compare it (i didn't and it looks like this). If you want to add more spots, select the previous concoction and duplicate it. Then add a Mix Node, change Float to Color and connect both lines into it, and it into Base color. Shift+A allows you to speed up this whole process.
Few things to note, you CAN change the color in the ColorRamp to be transparent. Then connect the Alpha into the Factor and Mix it that way. Or change from Mix to Multiply, or Overlay, or anything you want. There's multiple ways to reach the same goal, chose the one you prefer.
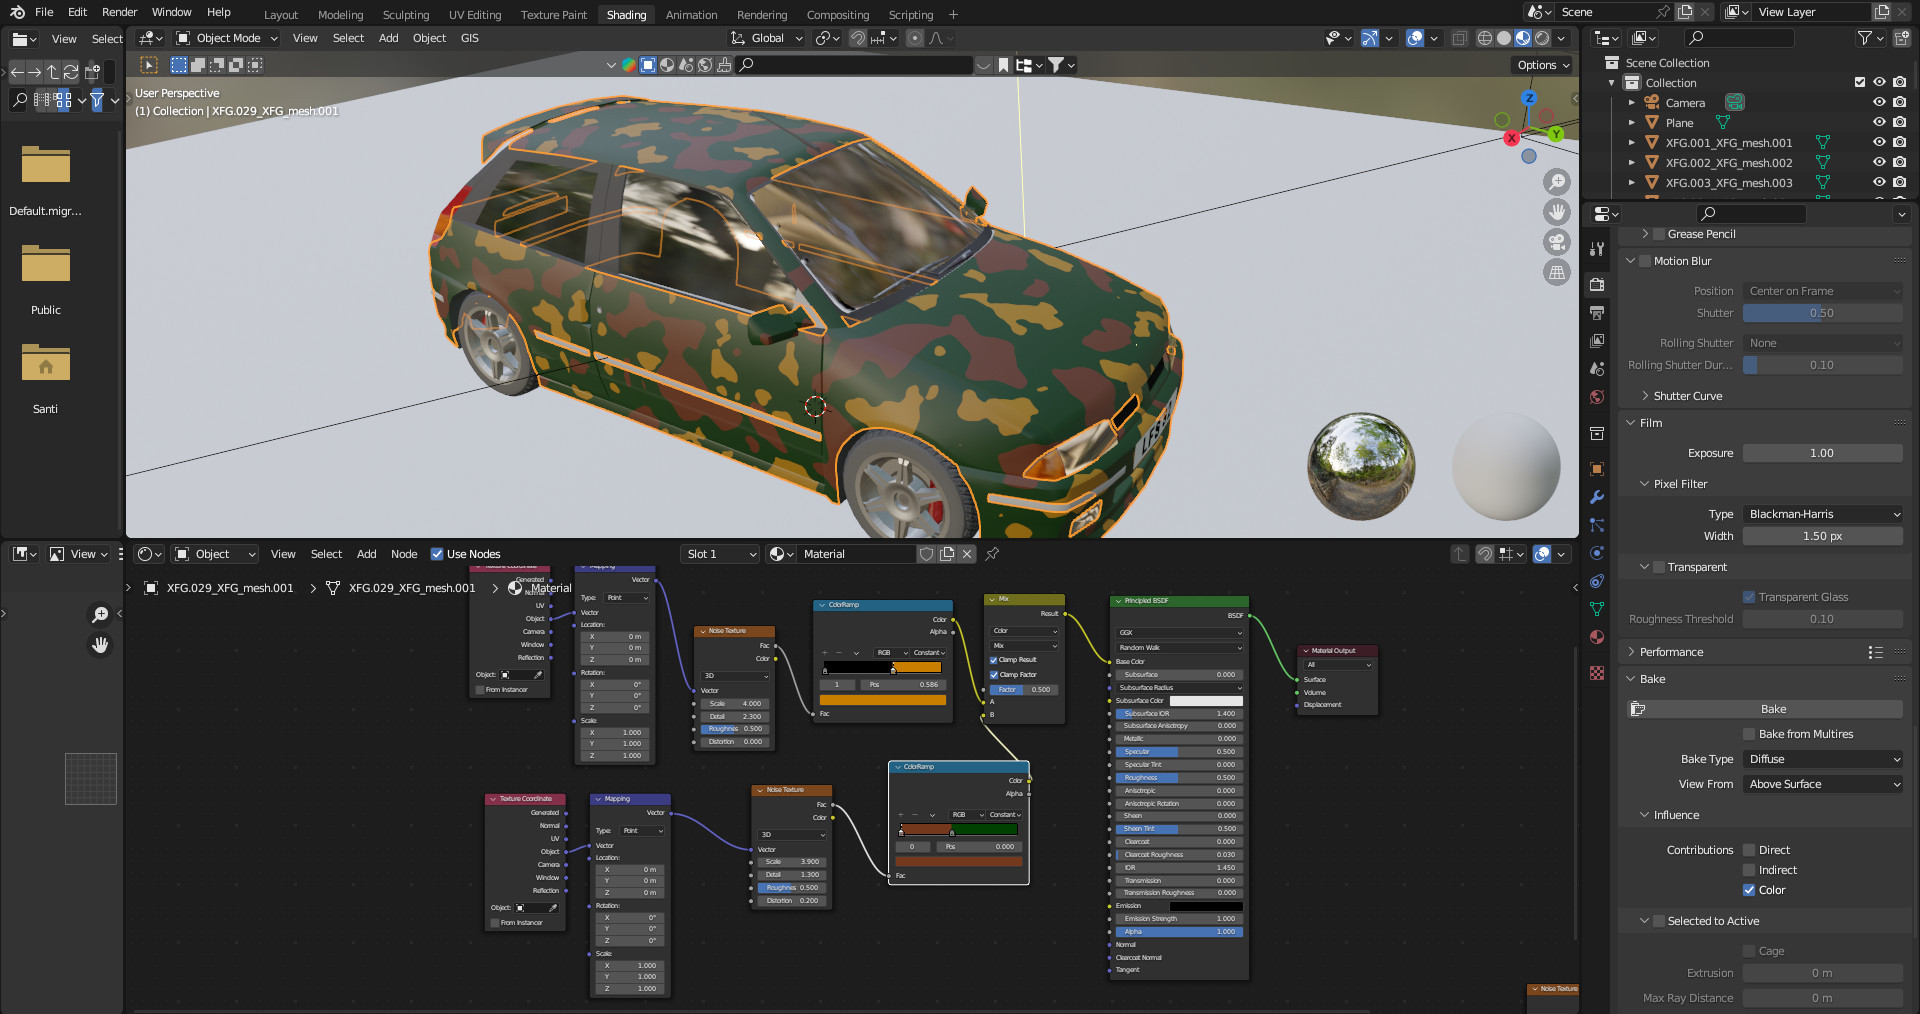
Also Adding a Snap Node with a value connected to increment makes the camo look digital. Connect it between the Mapping and the Noise Texture.
Great! Let's bake it. Add a Image Node in the Shader Editor and Click New, make your prefered options (1024x1024 should work fine) and keeping the Image Node selected AND the mesh selected. Click the Bake button in Render Properties. Now you should see your texture in Image Editor tab, click the 3 horizontal lines>Image>Save As and you have your texture.
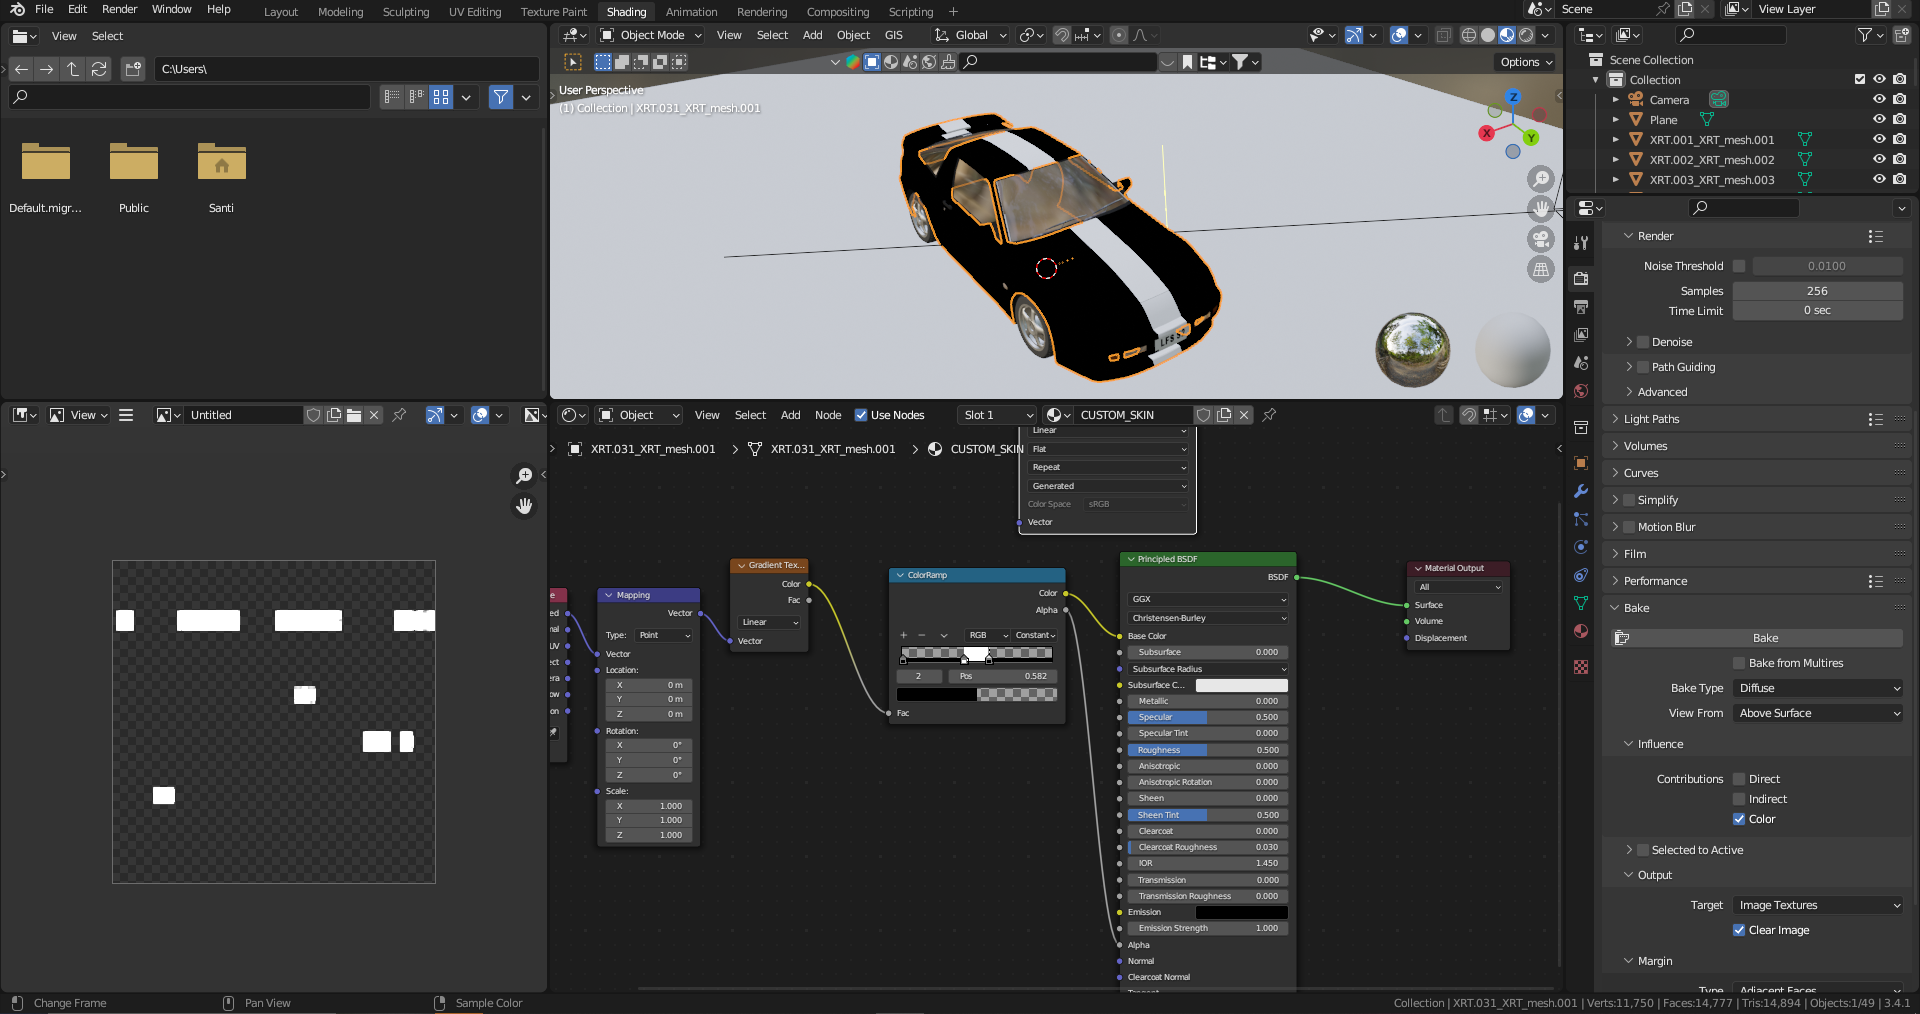
Moving on into a more versatile example. With a Gradient Texture connected the same way (Texture Coordinate>Mapping>Gradient Texture>ColorRamp>Base Color) add a color stop in the ColorRamp, change its color to transparent and move the Arrows until it looks like a stripe. Connect the Alpha wire from the ColorRamp into the Alpha from the PrincipledBSDF and bake it. This image you can Paste as a layer in any image editor and you will have an instant Stripe in any skin.
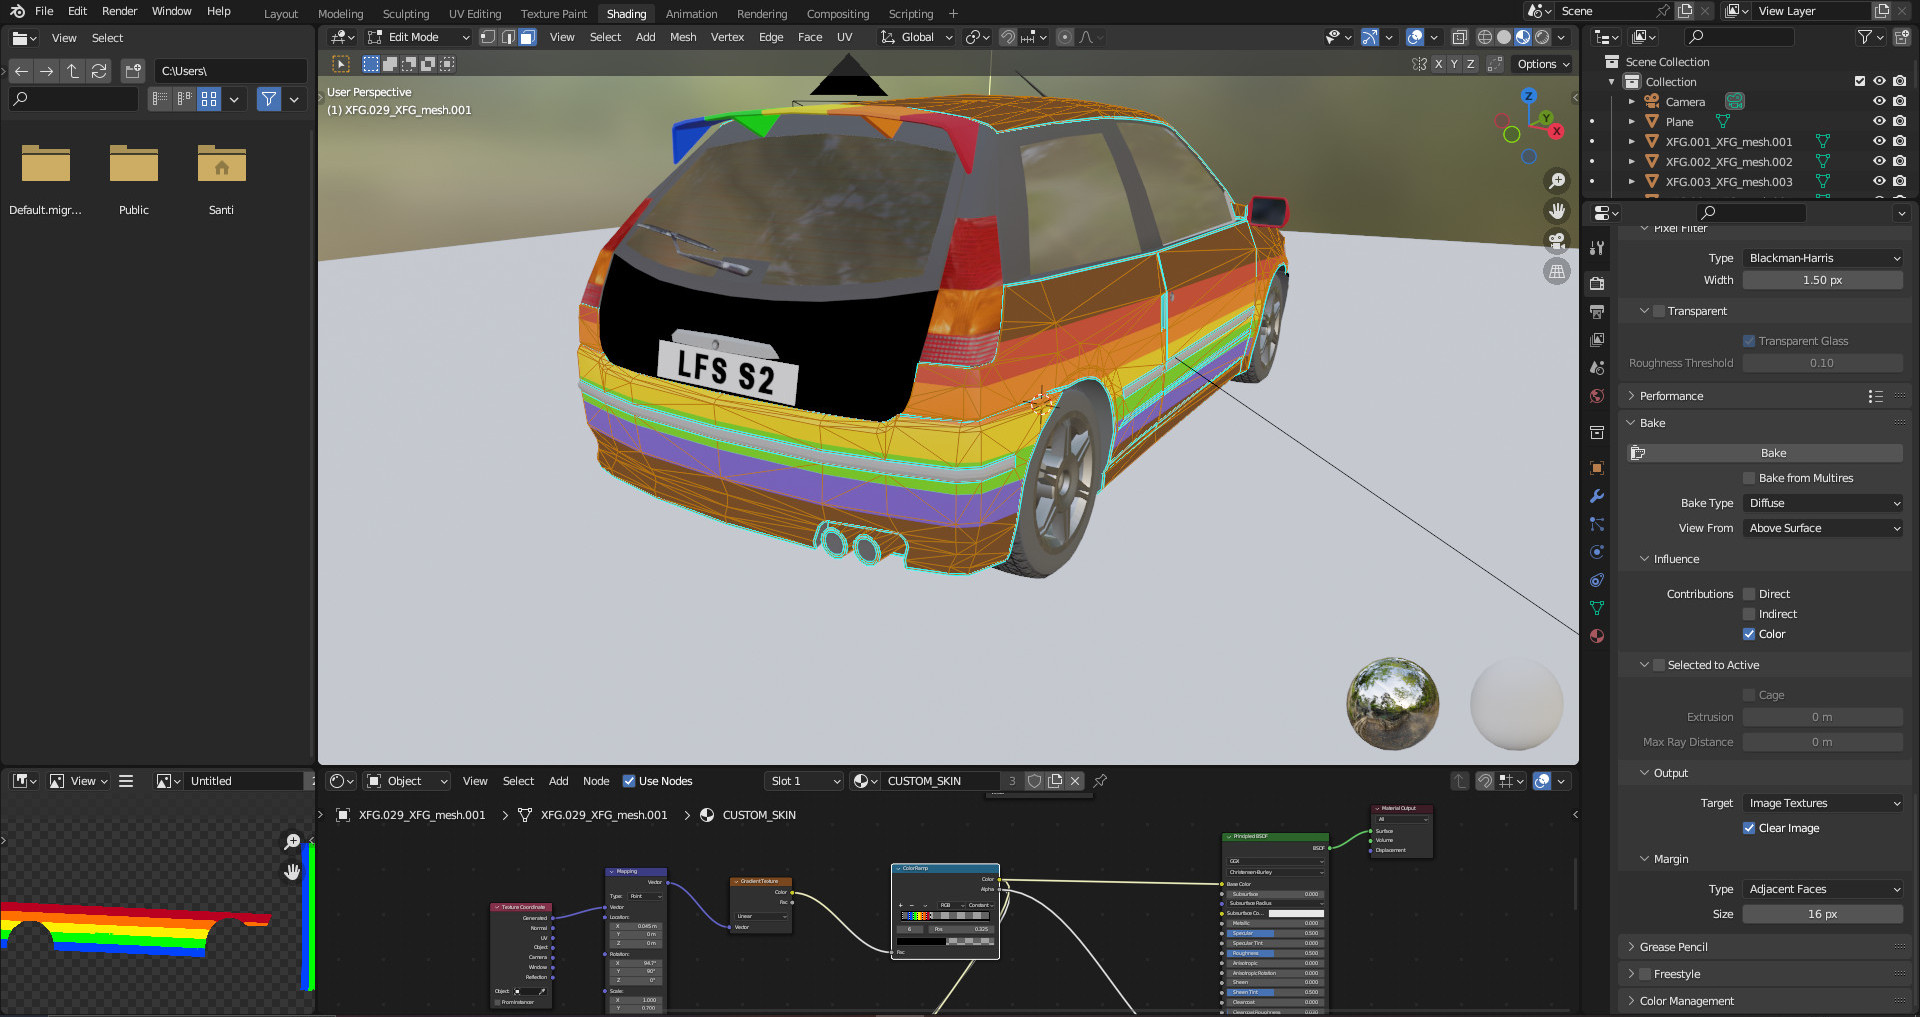
With the knowledge from the previous example i made this rainbow stripe, placing it is tricky but with trial and error it's feasible. If you want it to only appear in certain panels of the car, i can show you another trick. Go to Edit Mode (Press Tab) deselect everything (Press A twice) and with the mouse over the panels you don't want, press L. Then go to Mesh>Separate>Selection (or press P). You can bake this meshes separately now. Or join them again with Ctrl+J.
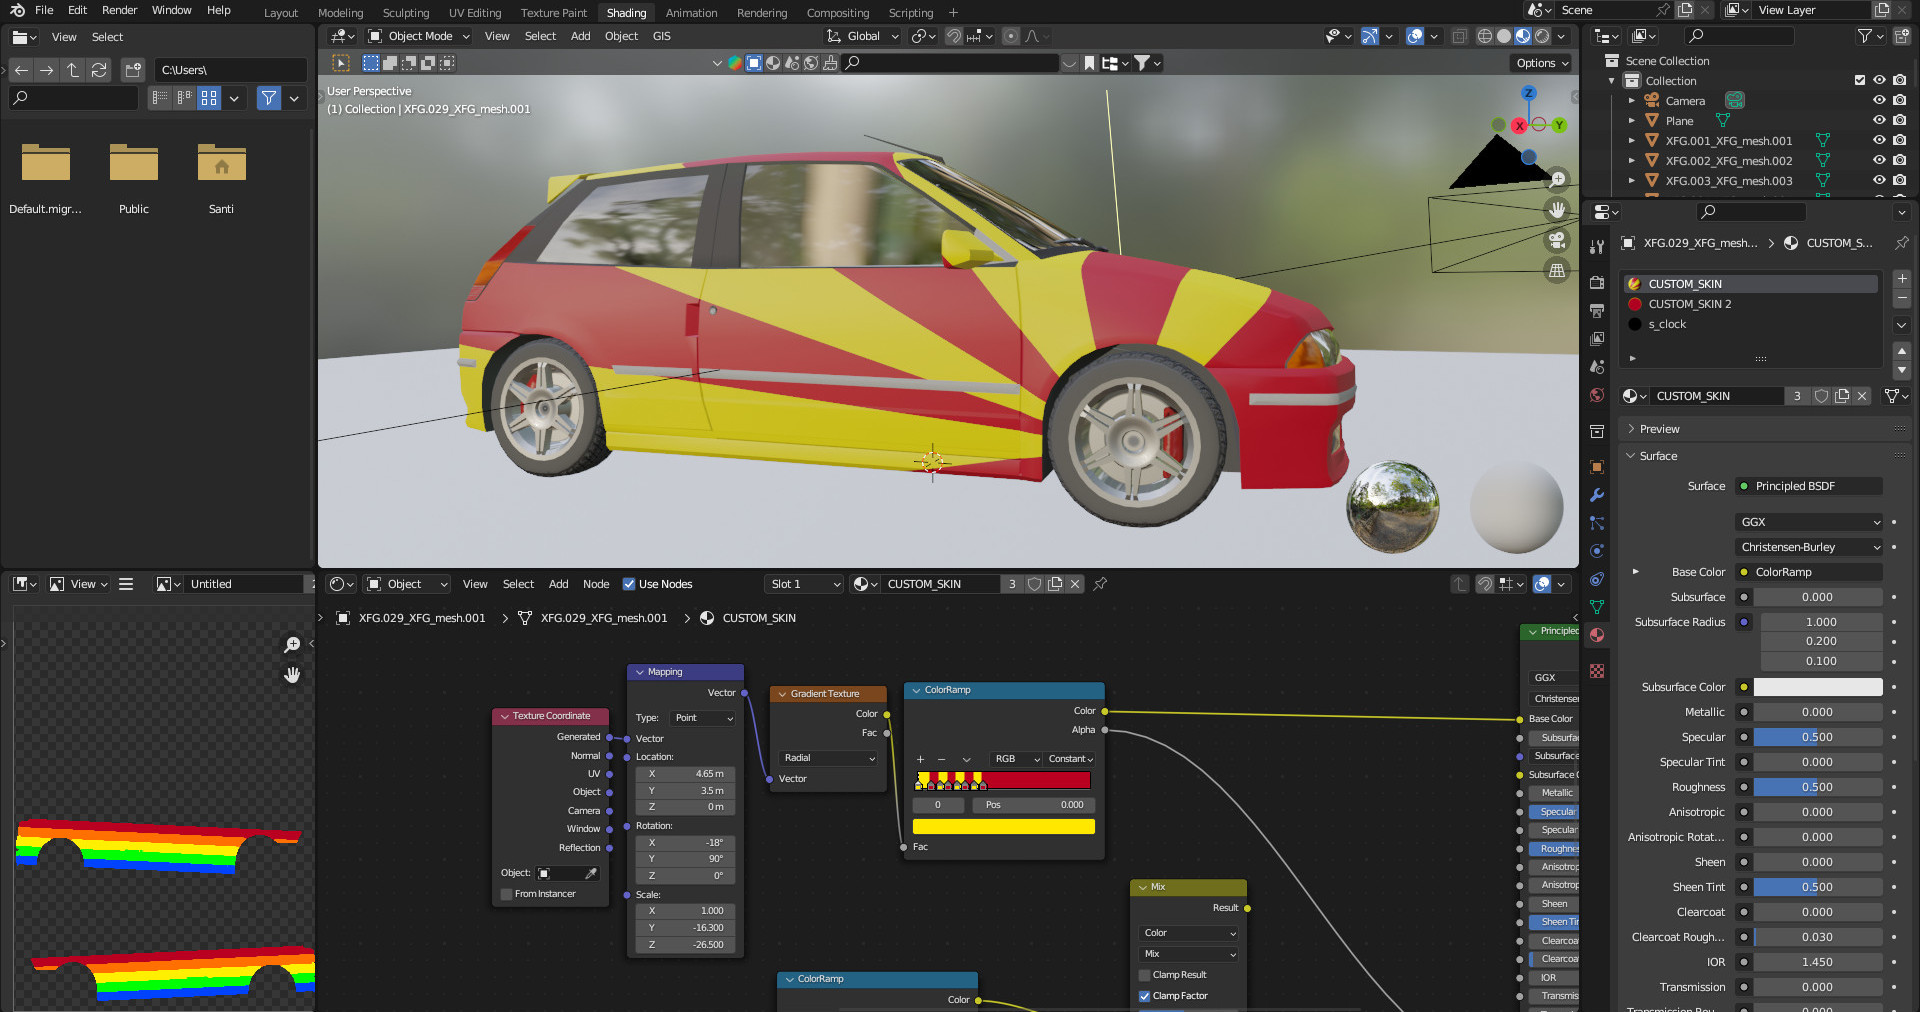
Some few uses for the Gradient Texture, change Linear to Radial and you can achieve this. Or change it into Quadratic to achieve this, the limit really is your imagination.

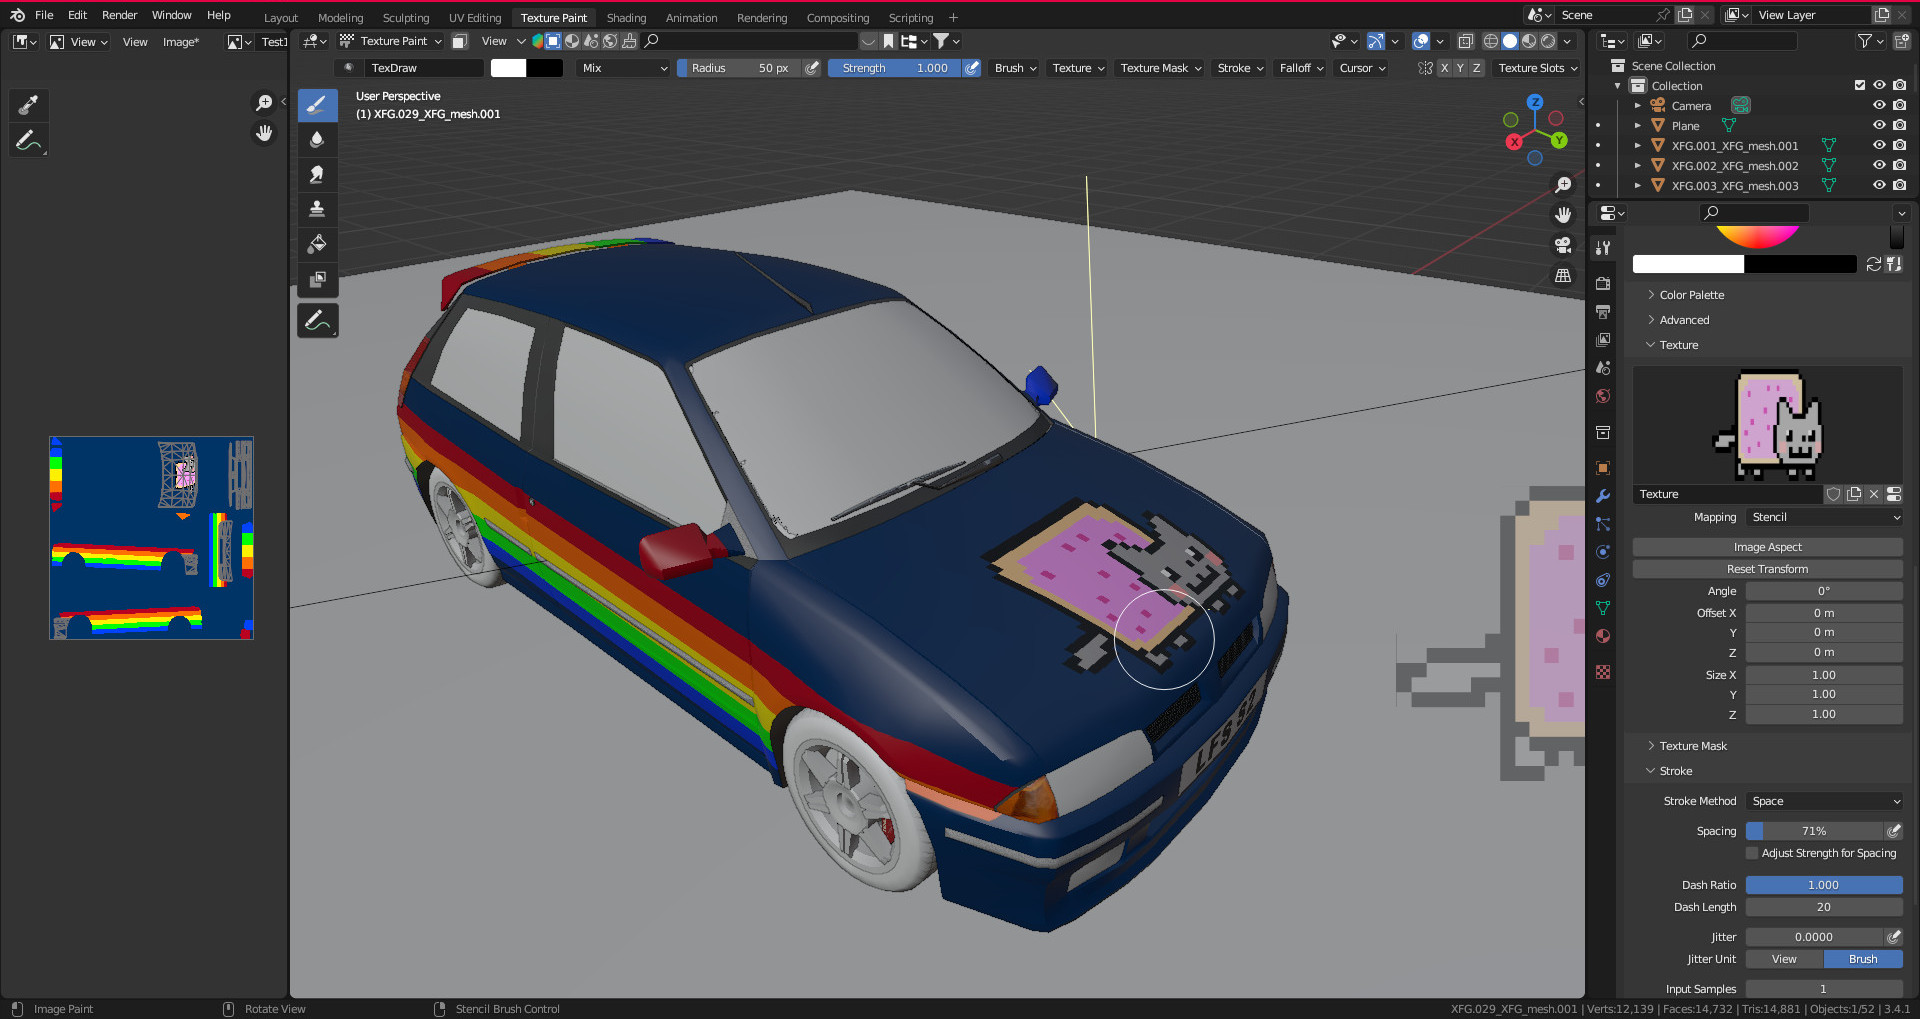
Moving on into the next feature, you've baked your image and now you want it to have stickers. Fair enough, select the image and connect that into the Base Color. Then go to the Texture Paint tab, click New then click Open in the Texture Properties tab in the lateral bar (checkered square). Search for your PNG and after you select it, disable Interpolation. You can paint the sticker now, for better placing go to Active Tool (the first tab in the lateral bar) and change the Mapping to Stencil. This enables you to move the PNG with your mouse, using right click, Ctrl+right click and Shift+ right click. Change the Falloff to Constant for a sharper edge.
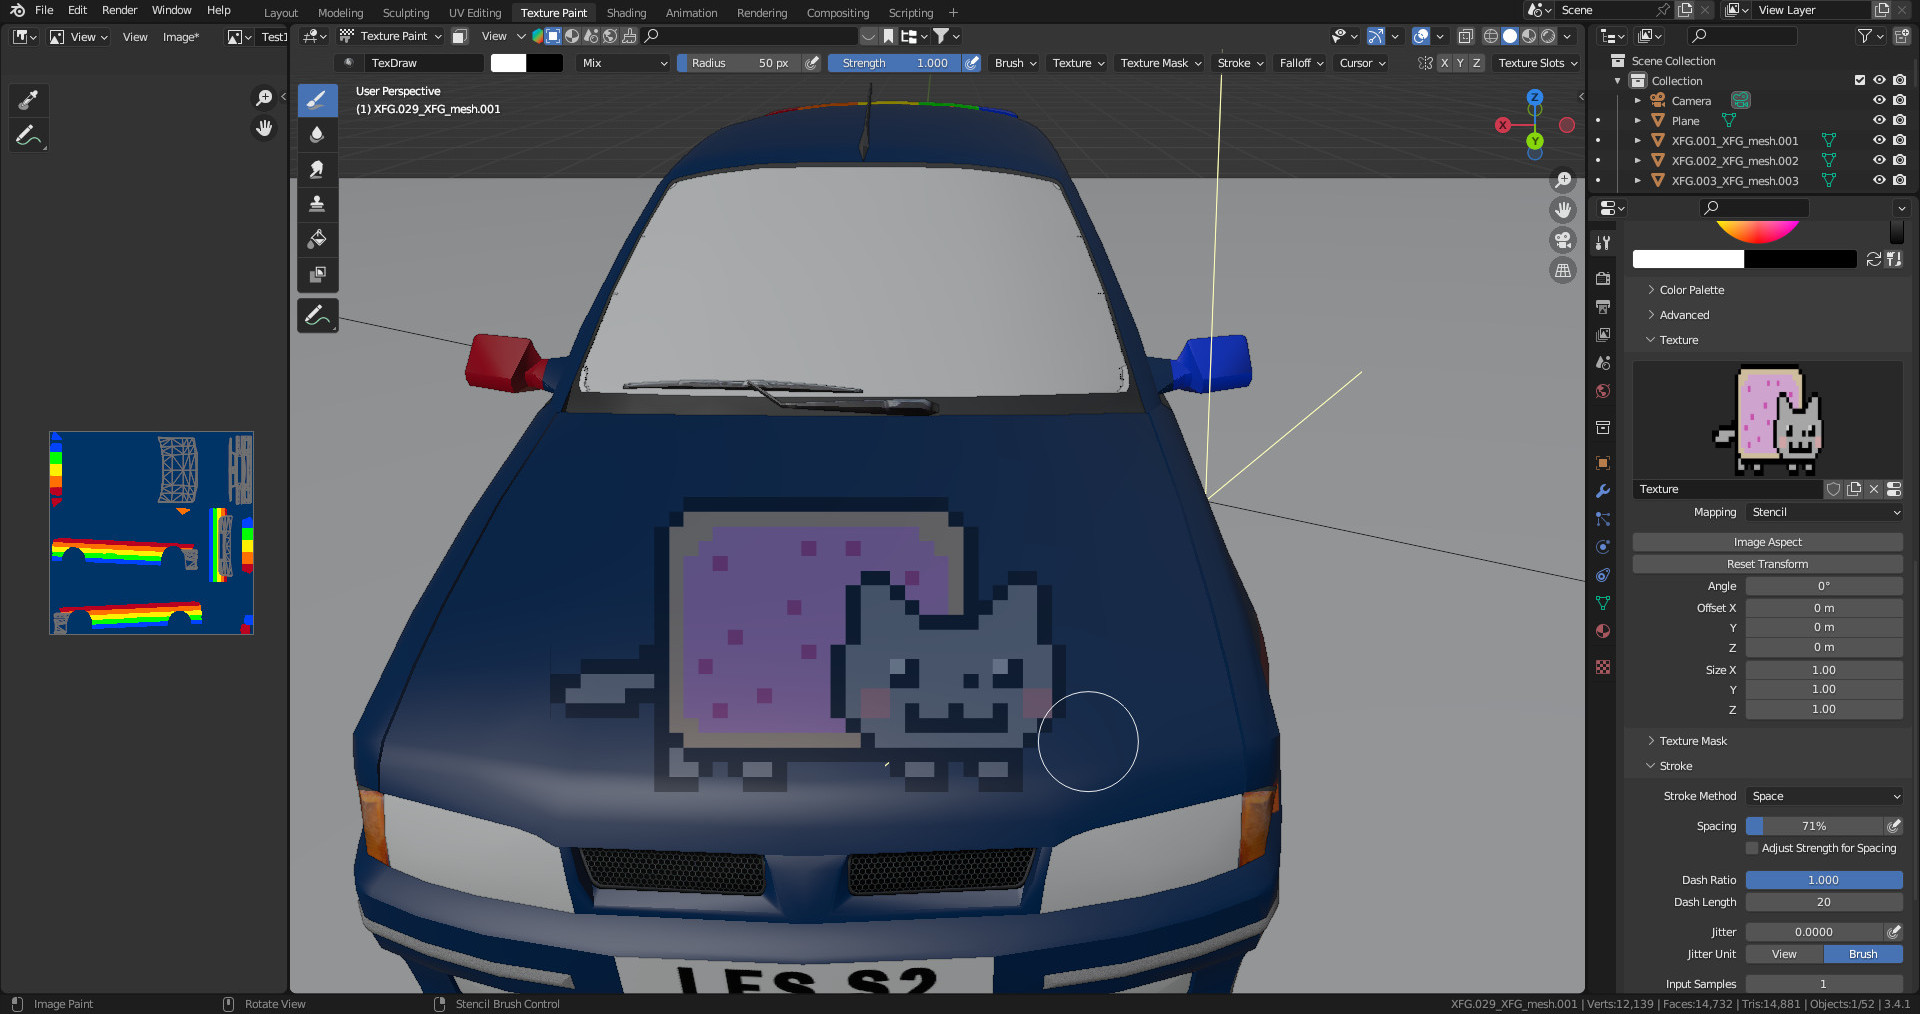
Placing your stickers this way allows you to control the way it looks, in the sense that it changes with the perspective you're placing it with. Putting the camera close and it will look very deformed, put it into Orthographic (numpad 5) and it will look mostly perfect. If the Stencil looks somewhat weird, click Reset Transform and Image Aspect and it should be spot on.
This is the end of my ramblings concerning some of the uses you can bring with this tool. If you're sane after subjecting your eyes to my horrid creations, leave a comment
*Just realized i made a blunder uploading the images , welp here it goes again.
https://www.lfs.net/forum/thread/95307-NEW-Blend-and-OBJ-Files-for-All-LFS-Cars-Updated-v1-2%21
Also there's a video and a post that goes onto some of the stuff i'm doing, credit where credit is due:
https://www.youtube.com/watch?v=HkRlqbFo0SA
https://www.lfs.net/forum/thread/95303-Tutorial%3A-Procedural-skins-using-Blender%21
First and foremost, Blender has a feature which lets you bake textures. Meaning you can make a procedural skin and bake it into an image. This allows you to have a seamless, form fitting texture that you can apply to a multitude of cars.
To make it you will need to have enabled Cycles as a Render Engine (In Render Properties, the camera icon in the lateral bar) Then the Bake section, put Bake Type in Diffuse and check "Color". You don't need Indirect and Direct, but if you want to you can enable them and put an HDRI image for light. This will give you a texture which has shadows and ambient colors, which would look good if the same enviroment aligns in LFS. It wont.
Now, let's say you want for example, a camo skin. Go to the Shader Editor (or Shading tab at the upper bar) and add a Noise Texture, a ColorRamp and connect this to the base color. Change the Noise Texture from Linear to Constant and move the arrow to the middle, if you select the arrow and click it's color at the bottom it allows you to change it. It does look wonky though, to fix it add a Texture Coordinate and a Mapping (in that order) or press Ctrl+T if you have Node Wrangler enabled. Play with the values until it looks good, i recommend having a reference picture to compare it (i didn't and it looks like this). If you want to add more spots, select the previous concoction and duplicate it. Then add a Mix Node, change Float to Color and connect both lines into it, and it into Base color. Shift+A allows you to speed up this whole process.
Few things to note, you CAN change the color in the ColorRamp to be transparent. Then connect the Alpha into the Factor and Mix it that way. Or change from Mix to Multiply, or Overlay, or anything you want. There's multiple ways to reach the same goal, chose the one you prefer.
Also Adding a Snap Node with a value connected to increment makes the camo look digital. Connect it between the Mapping and the Noise Texture.
Great! Let's bake it. Add a Image Node in the Shader Editor and Click New, make your prefered options (1024x1024 should work fine) and keeping the Image Node selected AND the mesh selected. Click the Bake button in Render Properties. Now you should see your texture in Image Editor tab, click the 3 horizontal lines>Image>Save As and you have your texture.
Moving on into a more versatile example. With a Gradient Texture connected the same way (Texture Coordinate>Mapping>Gradient Texture>ColorRamp>Base Color) add a color stop in the ColorRamp, change its color to transparent and move the Arrows until it looks like a stripe. Connect the Alpha wire from the ColorRamp into the Alpha from the PrincipledBSDF and bake it. This image you can Paste as a layer in any image editor and you will have an instant Stripe in any skin.
With the knowledge from the previous example i made this rainbow stripe, placing it is tricky but with trial and error it's feasible. If you want it to only appear in certain panels of the car, i can show you another trick. Go to Edit Mode (Press Tab) deselect everything (Press A twice) and with the mouse over the panels you don't want, press L. Then go to Mesh>Separate>Selection (or press P). You can bake this meshes separately now. Or join them again with Ctrl+J.
Some few uses for the Gradient Texture, change Linear to Radial and you can achieve this. Or change it into Quadratic to achieve this, the limit really is your imagination.
Moving on into the next feature, you've baked your image and now you want it to have stickers. Fair enough, select the image and connect that into the Base Color. Then go to the Texture Paint tab, click New then click Open in the Texture Properties tab in the lateral bar (checkered square). Search for your PNG and after you select it, disable Interpolation. You can paint the sticker now, for better placing go to Active Tool (the first tab in the lateral bar) and change the Mapping to Stencil. This enables you to move the PNG with your mouse, using right click, Ctrl+right click and Shift+ right click. Change the Falloff to Constant for a sharper edge.
Placing your stickers this way allows you to control the way it looks, in the sense that it changes with the perspective you're placing it with. Putting the camera close and it will look very deformed, put it into Orthographic (numpad 5) and it will look mostly perfect. If the Stencil looks somewhat weird, click Reset Transform and Image Aspect and it should be spot on.
This is the end of my ramblings concerning some of the uses you can bring with this tool. If you're sane after subjecting your eyes to my horrid creations, leave a comment
*Just realized i made a blunder uploading the images
, welp here it goes again.
Last edited by neuroticat, .
SF24 & MCL38

SF24 (Ferrari) MCL38 (Mclaren)
Carlos Sainz - 55 Lando Norris - 4
Charles Leclerc - 16 Oscar Piastri - 81
+ Non Numbered skin for both teams
Carlos Sainz - 55 Lando Norris - 4
Charles Leclerc - 16 Oscar Piastri - 81
+ Non Numbered skin for both teams
W15 & AMR24
W15 (Mercedes 2024) AMR24 (Aston martin 2024)
George Russell - 63 Fernando Alonso - 14
Lewis Hamilton - 44 Lance Stroll - 18
+ Non Numbered skin for both teams
George Russell - 63 Fernando Alonso - 14
Lewis Hamilton - 44 Lance Stroll - 18
+ Non Numbered skin for both teams
Miata xr skin

I wanted a Miata skin (for XRG) and started looking for it but I couldn't find it so I made it myself. I hope you like it. ( EDİT: for 7.E press G to open popup lights) You can Use dds for better miata!
Last edited by katraYSA, .

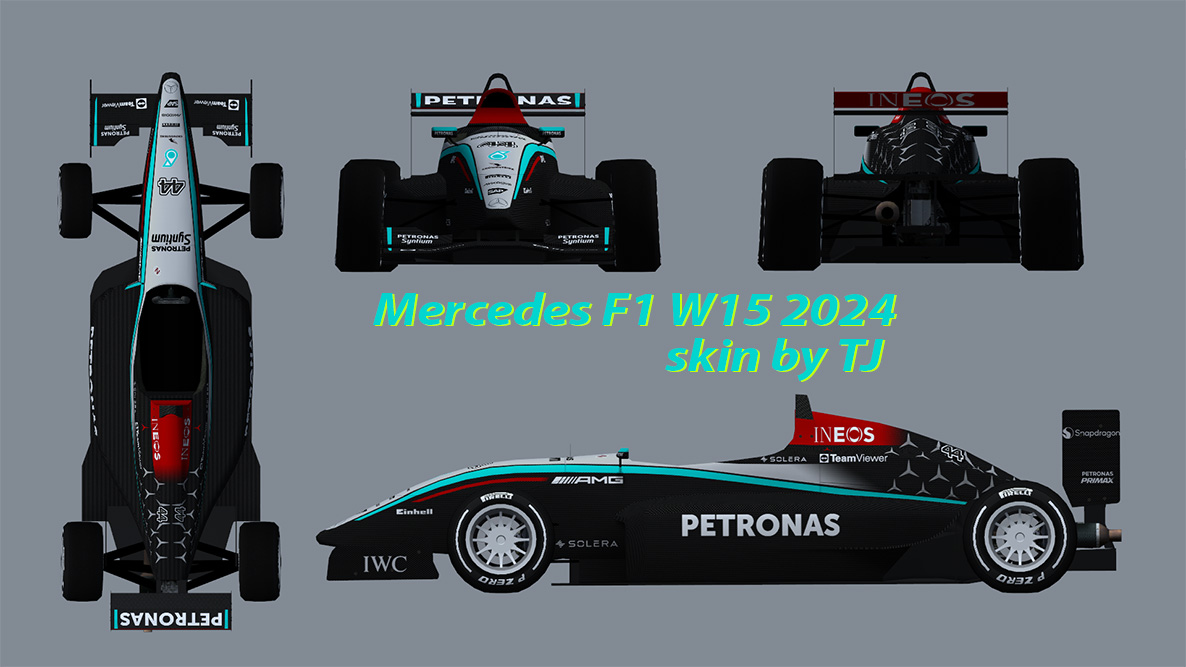
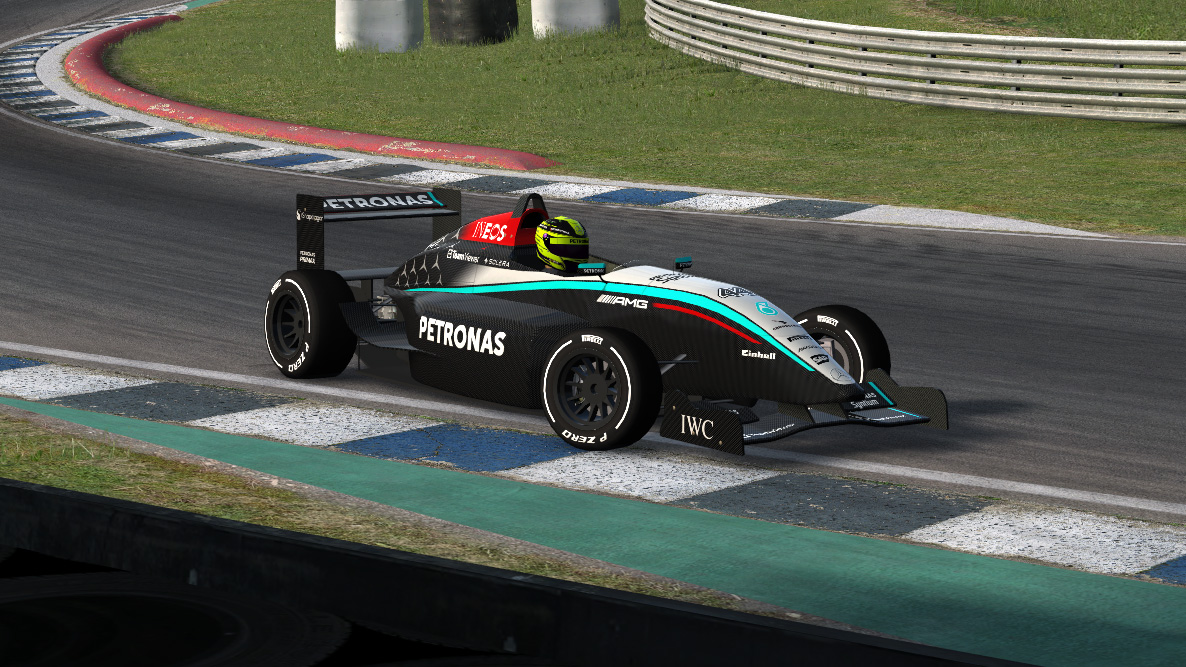
Hello again! FOX skin of the Mercedes F1 Team 2024 W15 car. Enjoy the livery!
Versions of Lewis Hamilton #44 and George Russell #63.

Versions of Lewis Hamilton #44 and George Russell #63.
Skin
Just a random skin with my favorite number, thx to the original creator i really love the skin
POLIZEI 2002
polizei 2002 SKIN https://www.mediafire.com/fil ... l4y7/XFG_POLIZEI.jpg/file
FRIDGE FUNNY CAR
funny skin for xf car [removed url]
Last edited by Scawen, .
Reason : removed url that doesn't work
minha skin file:///C:/LFS/data/skins/XRT_PinkStyle.jpg
Hello 2024! FOX skin of the Stake F1 Team 2024. Enjoy the livery!
Versions of Valtteri Bottas #77 and Zhou Guanyu #24.
edit: skin updated in 18/02/24, minor fix
Versions of Valtteri Bottas #77 and Zhou Guanyu #24.
edit: skin updated in 18/02/24, minor fix
Last edited by TJbr, .
An Torro rosso skin with the number 22 for the FBM

How about to mention skin for which car or mod? Or that doesn't matter?
Pls make me that
Can someone make me a torro rosso skin with the number 22

you have to give us more info about your requested skin. ex. for wich car/mod and etc.
Can anyone make me a [CT] Coderz Team

Can anyone make a [CT] Coderz Team skin plz and also join my host [CT] Coderz Team.Plz send me
Need a Medical Skin for Mod AHMED 4.0RS skin iD 2FE130
Hey Guys,
i need a Medical skin for the Car named above
it should look similar to that (https://www.design112.de/blog/tag/foliensatz-audi-a4/)
but i would love to have one with the same colour scheme
And one with main color white and some blue or even a neon green/yellow accents
i dont have any preference for that one so u could make ur own idea

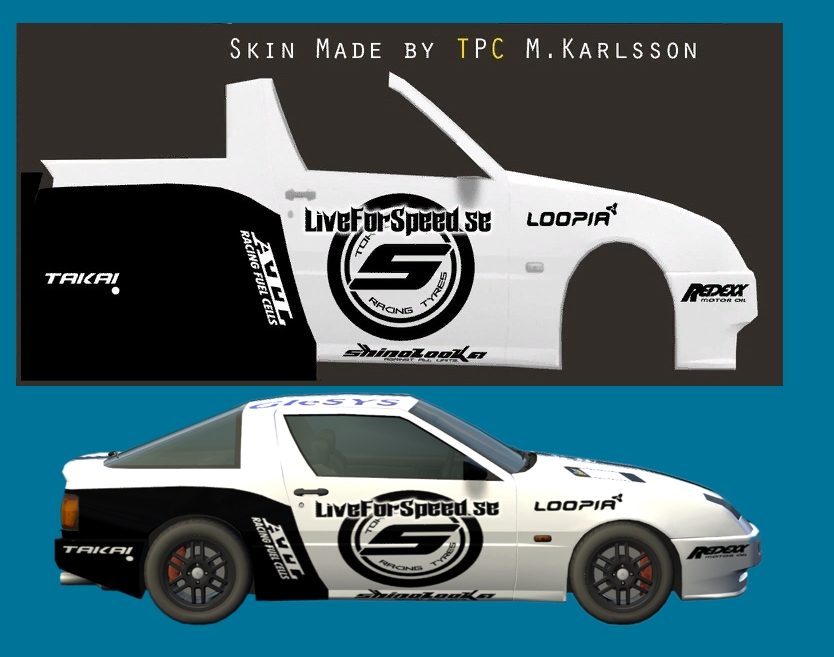
what works for me is to grab a blender skin rendering kit, add a new UV layout and arrange it in a way that avoids stretching, then working in GIMP and previewing in the skin using that new layout in Blender
after I'm done, I just have to bake the project using the default UV layout and downscale to 2048p

Krita might be nice image editor aswell.
Make sure to check <game path>/data/skins/Skins_README.txt if you haven't already.
And if you got the urge to load-in image saved in .dds format, you can try out ImageMagick of FFmpeg to do so, quick google will show you what you need to get them running. Than both programs require just this one command line for basic usage:
Just remember that the 2D plane of the skin file LFS needs, due to technical reasons with 3D graphics, does not have proper aspect ratio when imported to the game. Thus, for example even size circle in the editor will become bit squeezed / elipse. Maybe one day someone will make plugin for blender to edit the skin when it's already mapped on car for best preview.
Make sure to check <game path>/data/skins/Skins_README.txt if you haven't already.
And if you got the urge to load-in image saved in .dds format, you can try out ImageMagick of FFmpeg to do so, quick google will show you what you need to get them running. Than both programs require just this one command line for basic usage:
ffmpeg -i from_dds.dds to_png.png
magick.exe from_dds.dds to_png.png
Just remember that the 2D plane of the skin file LFS needs, due to technical reasons with 3D graphics, does not have proper aspect ratio when imported to the game. Thus, for example even size circle in the editor will become bit squeezed / elipse. Maybe one day someone will make plugin for blender to edit the skin when it's already mapped on car for best preview.
XRT R32 Nakazato

i made Takeshi's R32 from Initial D. The skin is not very detailed, as it is my first skin. The skin is also not published, so it only works in singleplayer sry 

Why would you need to use editor for skin creation? In LFS garage you have the viewer where you can see the skin on car without hassle of converting dds for editor.
[solved] Problem with skin testing

So, I was making my first skin for the mod PROTOTYPE2, so I copied the veh file from "LFS\mods\vechiles" and pasted it to the veh folder of the LFS editor. Everything was fine with creating the skin after watching some tutorials.Finally I had finished my skin and tried testing it from the editor but I got an error: "19 png textures not found". I went to the folder where I got the 'veh' file from and copied the 'dds' files and then pasted in the folder the editor was referring to (png folder), it didn't work...I then turned the 'dds' into 'png' but didn't work either...
If anyone knows the solution or wants to suggest something please answer.
Thank you
If anyone knows the solution or wants to suggest something please answer.
Thank you
EM30 Repsol skin!
Hi you all!
im just sharing mi skin inspired in the repsol's fuel racing team
its my first skin i've made for the comunity, so i hope you like it!
Javi
im just sharing mi skin inspired in the repsol's fuel racing team
its my first skin i've made for the comunity, so i hope you like it!
Javi
FGED GREDG RDFGDR GSFDG