I decided to release the secret of the milanesa, a little how-to on some results you can accomplish with Blender. You're gonna need these models:
https://www.lfs.net/forum/thread/95307-NEW-Blend-and-OBJ-Files-for-All-LFS-Cars-Updated-v1-2%21
Also there's a video and a post that goes onto some of the stuff i'm doing, credit where credit is due:
https://www.youtube.com/watch?v=HkRlqbFo0SA
https://www.lfs.net/forum/thread/95303-Tutorial%3A-Procedural-skins-using-Blender%21
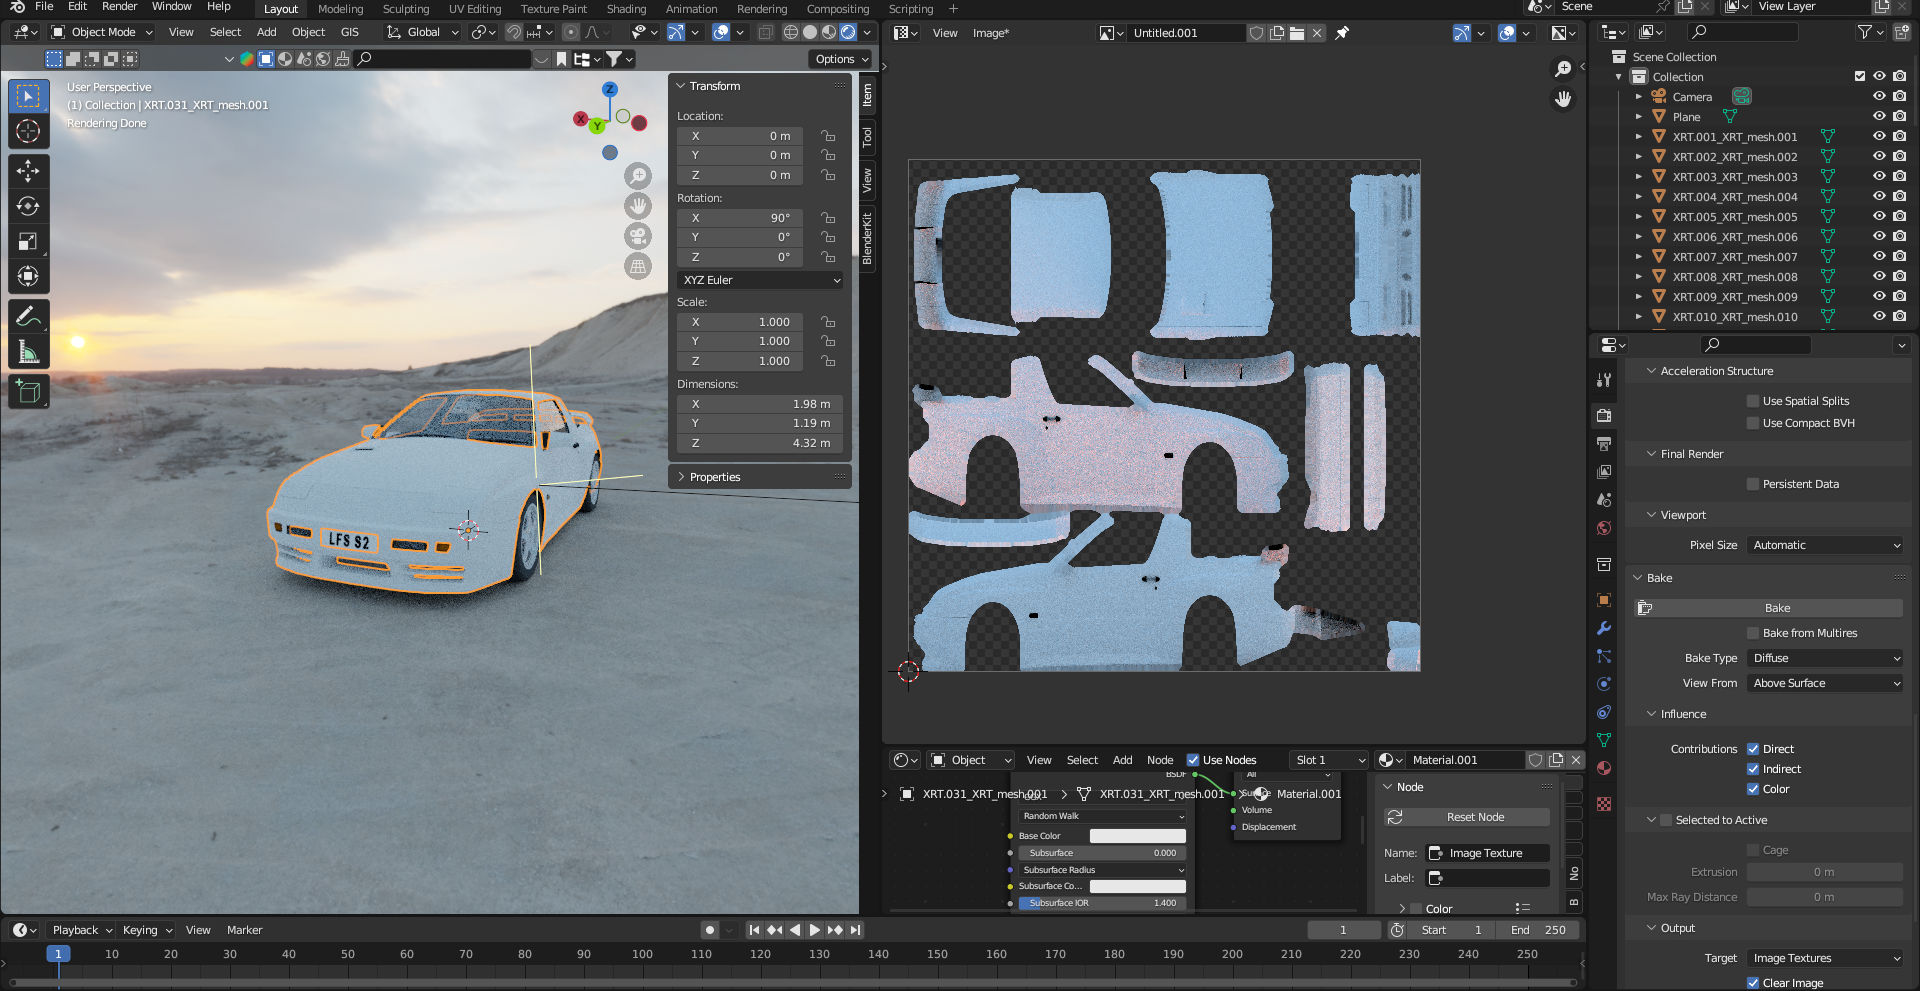
First and foremost, Blender has a feature which lets you bake textures. Meaning you can make a procedural skin and bake it into an image. This allows you to have a seamless, form fitting texture that you can apply to a multitude of cars.
To make it you will need to have enabled Cycles as a Render Engine (In Render Properties, the camera icon in the lateral bar) Then the Bake section, put Bake Type in Diffuse and check "Color". You don't need Indirect and Direct, but if you want to you can enable them and put an HDRI image for light. This will give you a texture which has shadows and ambient colors, which would look good if the same enviroment aligns in LFS. It wont.
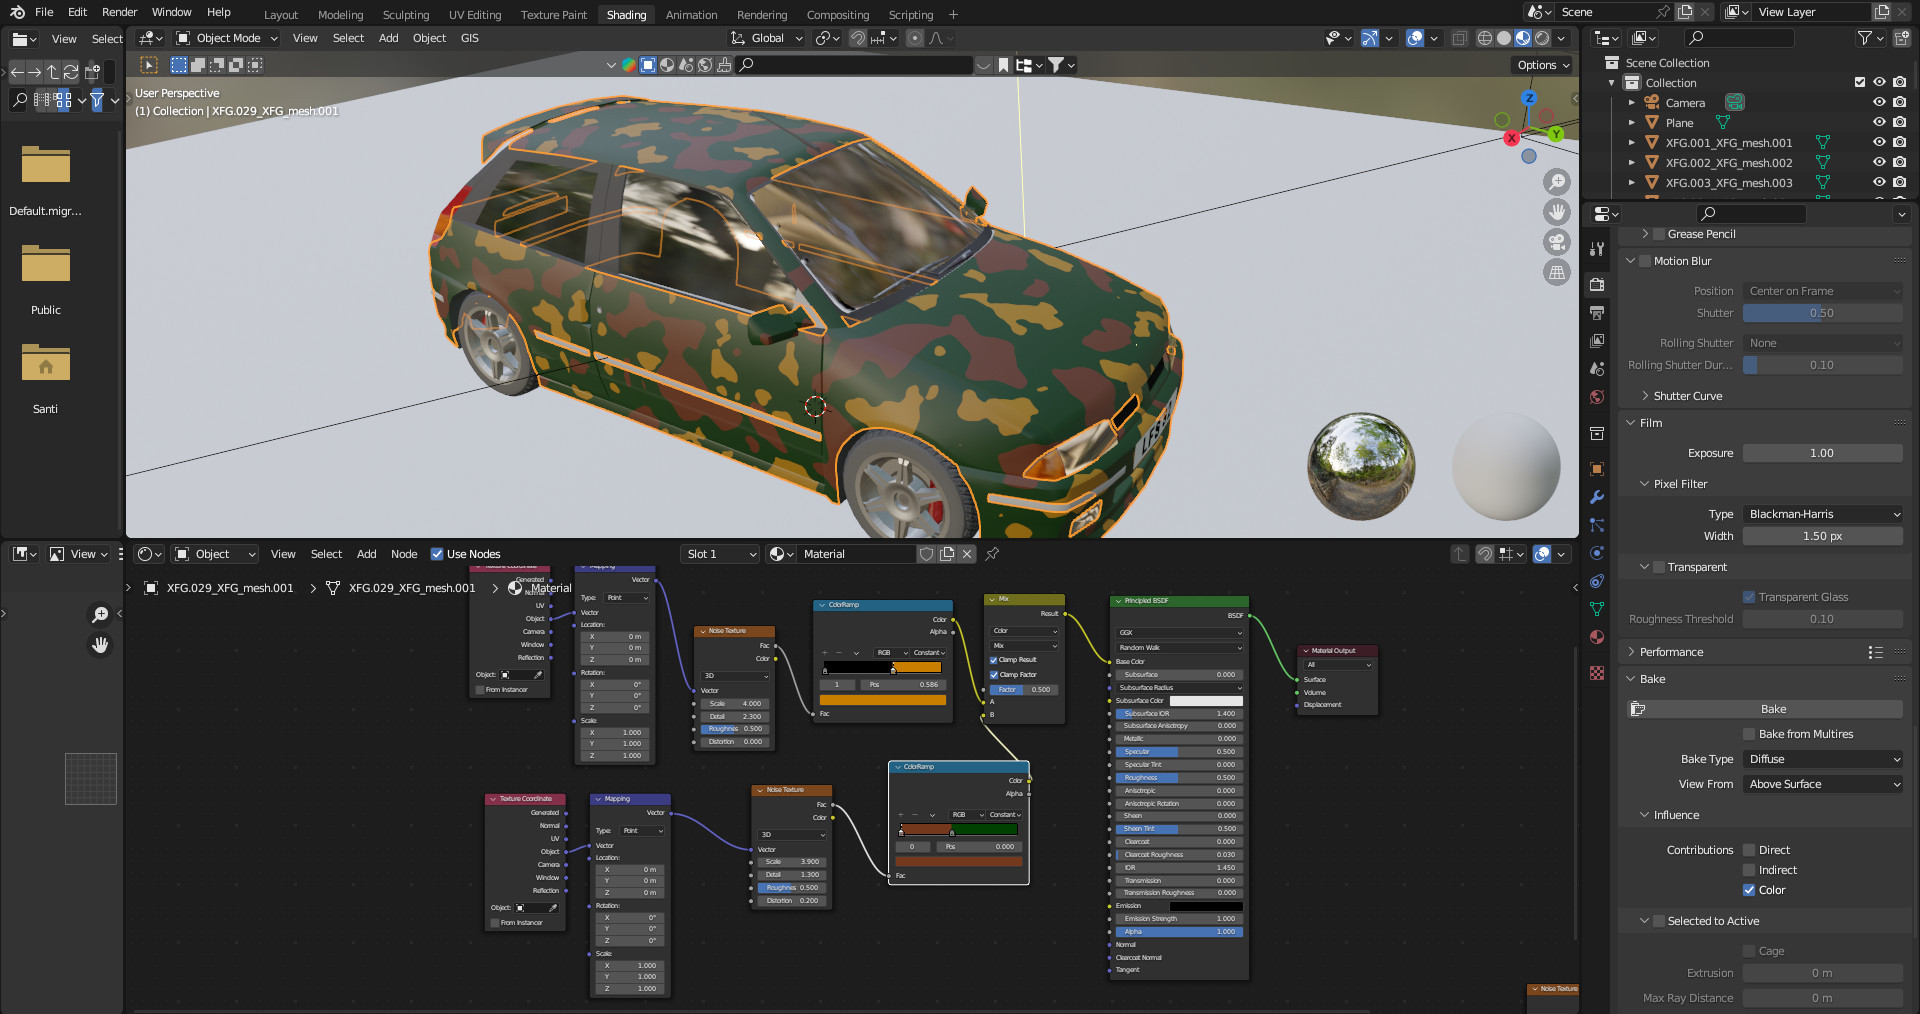
Now, let's say you want for example, a camo skin. Go to the Shader Editor (or Shading tab at the upper bar) and add a Noise Texture, a ColorRamp and connect this to the base color. Change the Noise Texture from Linear to Constant and move the arrow to the middle, if you select the arrow and click it's color at the bottom it allows you to change it. It does look wonky though, to fix it add a Texture Coordinate and a Mapping (in that order) or press Ctrl+T if you have Node Wrangler enabled. Play with the values until it looks good, i recommend having a reference picture to compare it (i didn't and it looks like this). If you want to add more spots, select the previous concoction and duplicate it. Then add a Mix Node, change Float to Color and connect both lines into it, and it into Base color. Shift+A allows you to speed up this whole process.
Few things to note, you CAN change the color in the ColorRamp to be transparent. Then connect the Alpha into the Factor and Mix it that way. Or change from Mix to Multiply, or Overlay, or anything you want. There's multiple ways to reach the same goal, chose the one you prefer.
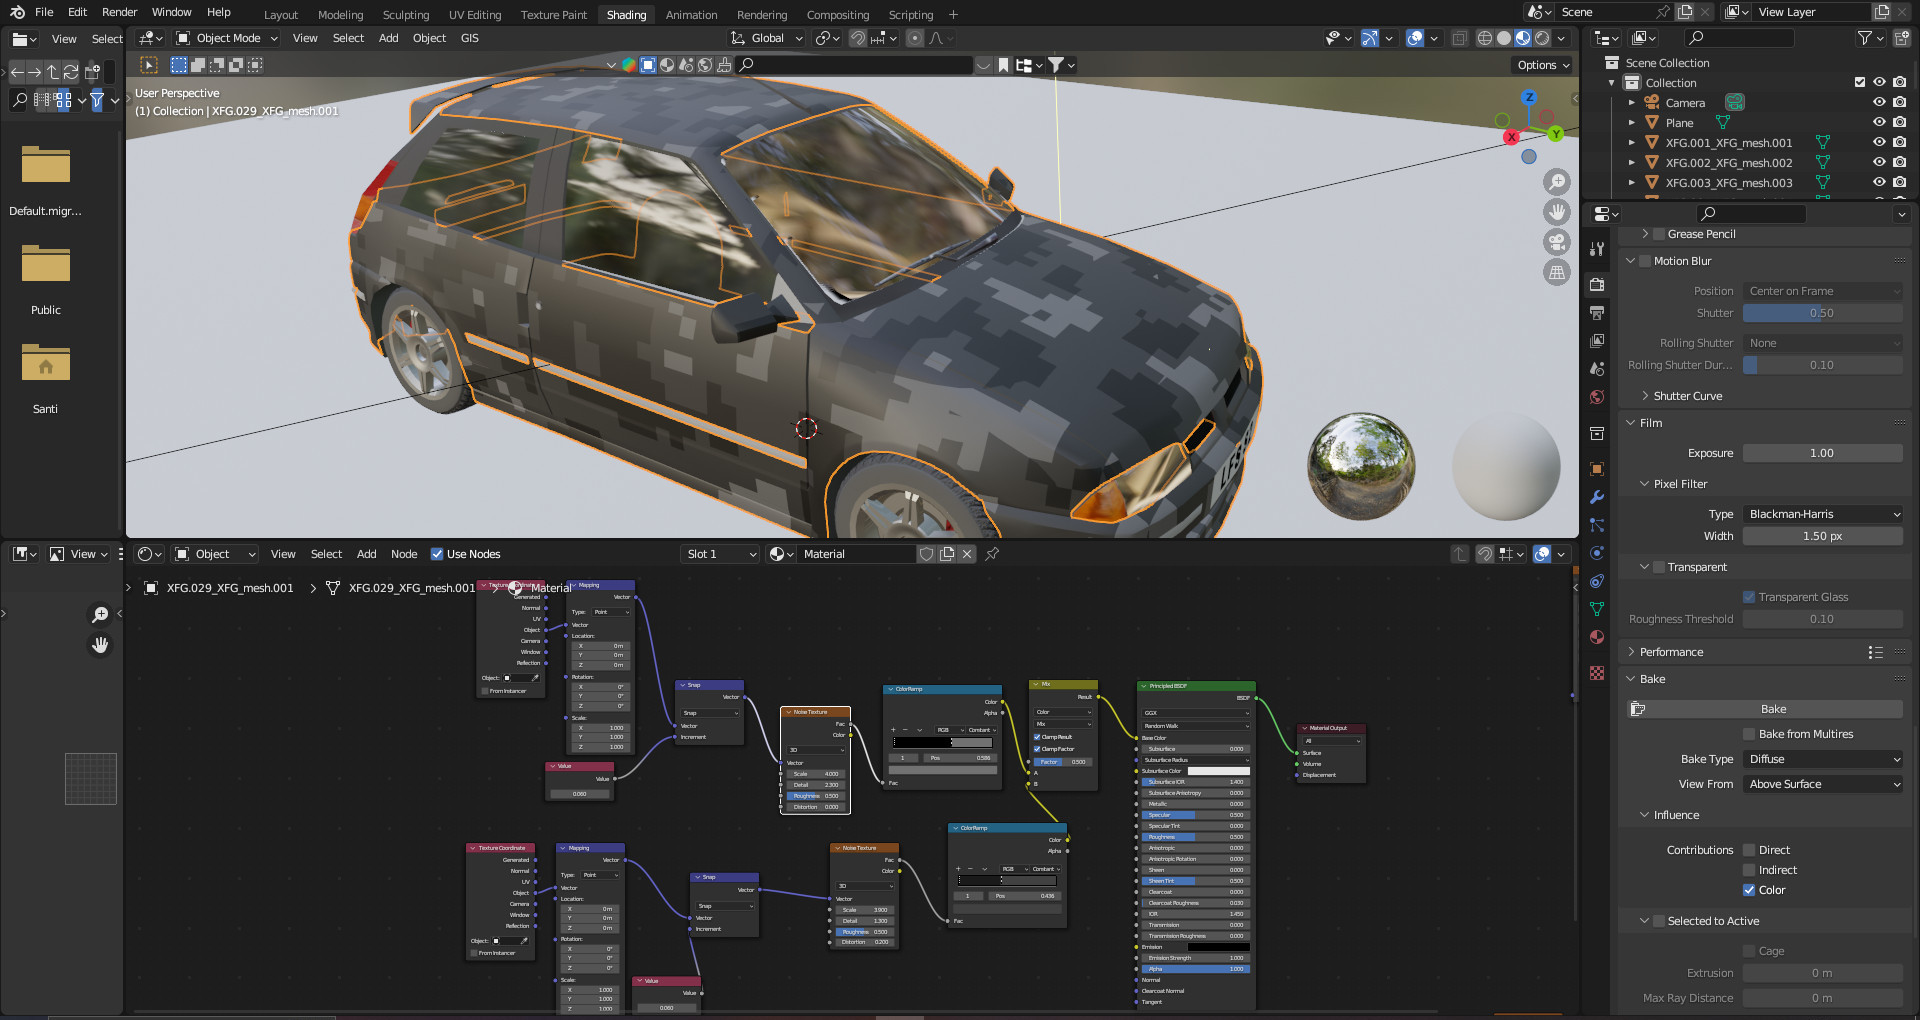
Also Adding a Snap Node with a value connected to increment makes the camo look digital. Connect it between the Mapping and the Noise Texture.
Great! Let's bake it. Add a Image Node in the Shader Editor and Click New, make your prefered options (1024x1024 should work fine) and keeping the Image Node selected AND the mesh selected. Click the Bake button in Render Properties. Now you should see your texture in Image Editor tab, click the 3 horizontal lines>Image>Save As and you have your texture.
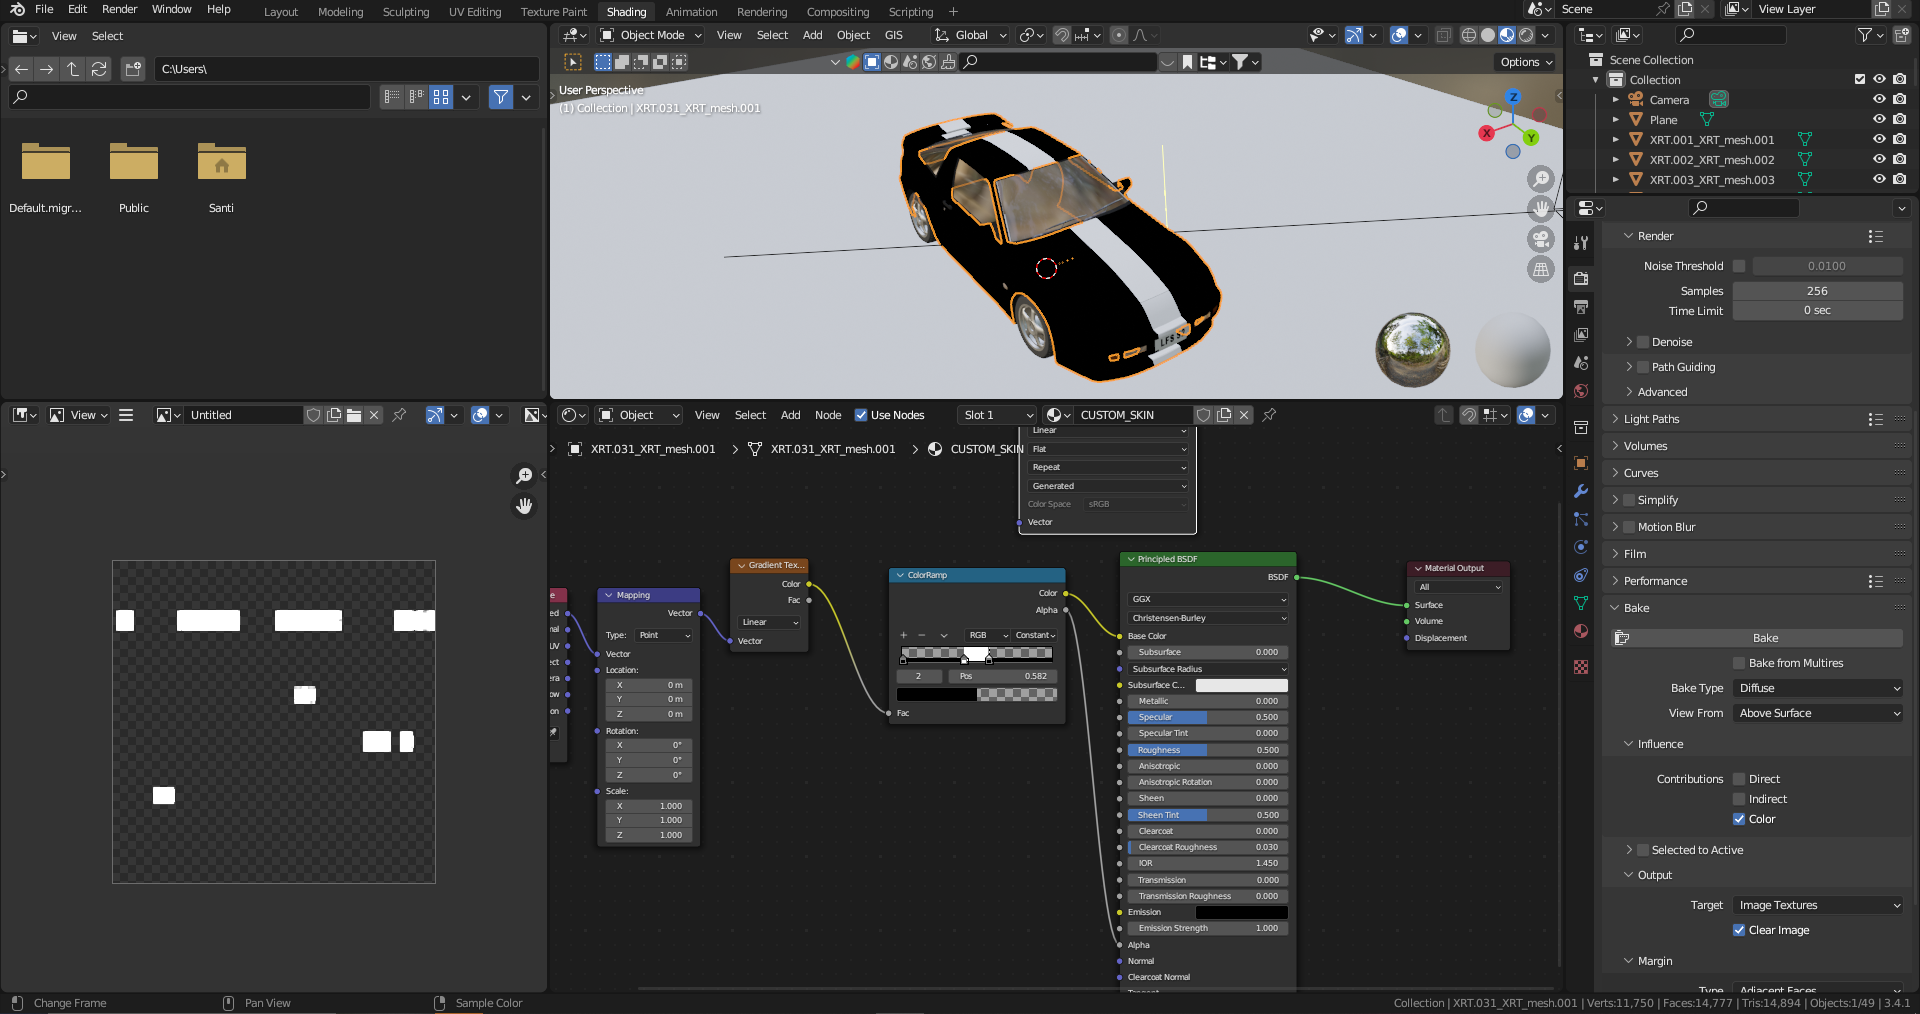
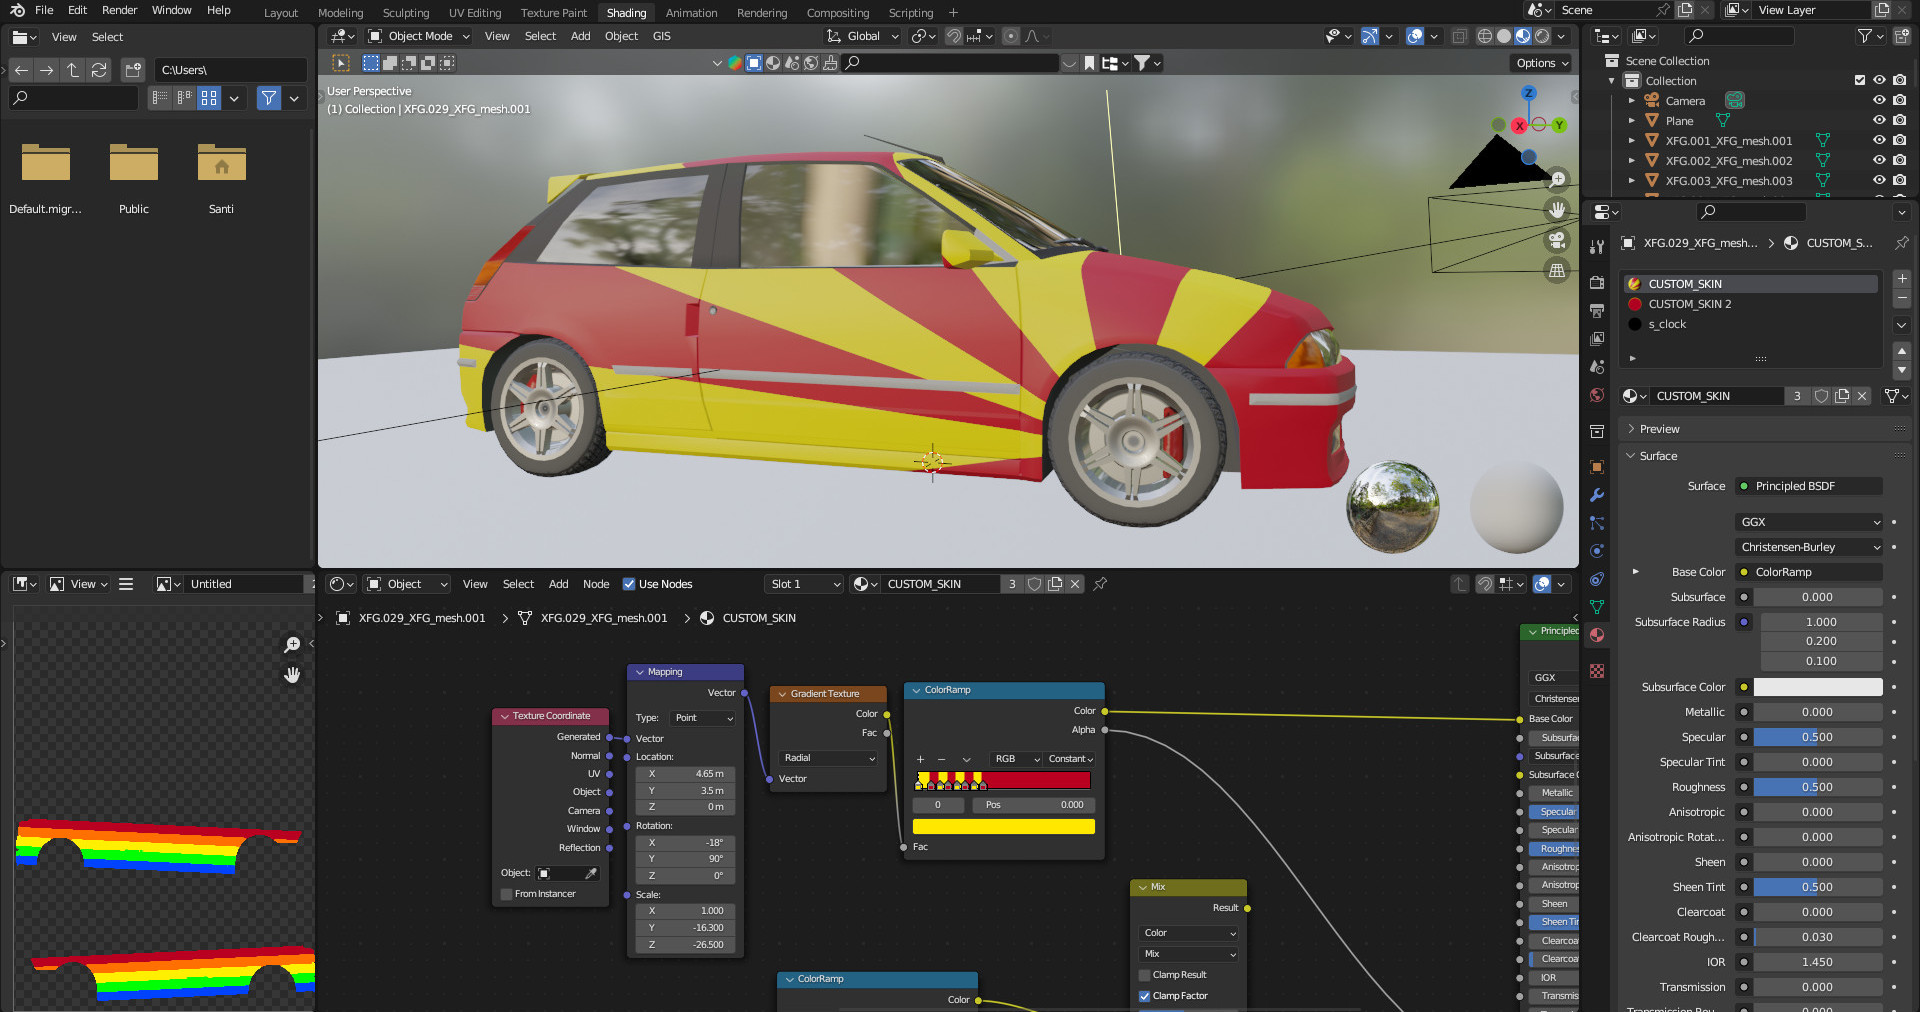
Moving on into a more versatile example. With a Gradient Texture connected the same way (Texture Coordinate>Mapping>Gradient Texture>ColorRamp>Base Color) add a color stop in the ColorRamp, change its color to transparent and move the Arrows until it looks like a stripe. Connect the Alpha wire from the ColorRamp into the Alpha from the PrincipledBSDF and bake it. This image you can Paste as a layer in any image editor and you will have an instant Stripe in any skin.
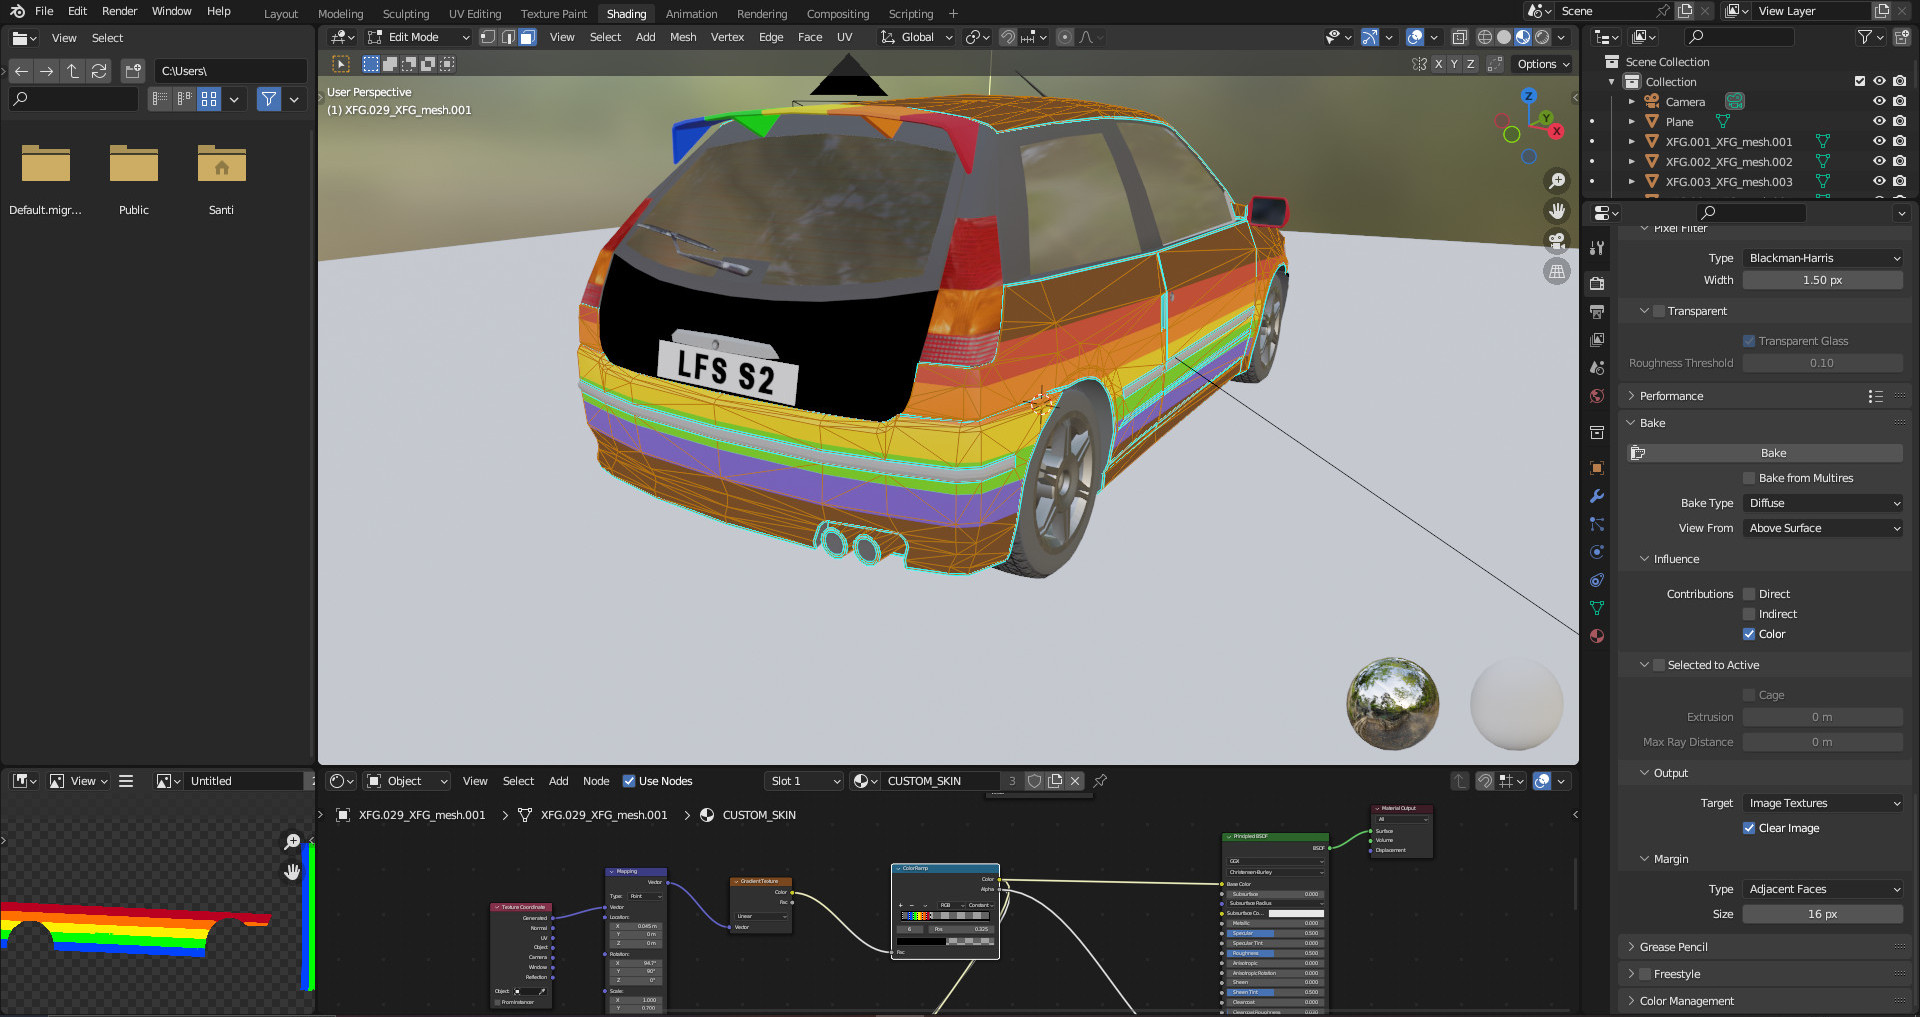
With the knowledge from the previous example i made this rainbow stripe, placing it is tricky but with trial and error it's feasible. If you want it to only appear in certain panels of the car, i can show you another trick. Go to Edit Mode (Press Tab) deselect everything (Press A twice) and with the mouse over the panels you don't want, press L. Then go to Mesh>Separate>Selection (or press P). You can bake this meshes separately now. Or join them again with Ctrl+J.
Some few uses for the Gradient Texture, change Linear to Radial and you can achieve this. Or change it into Quadratic to achieve this, the limit really is your imagination.

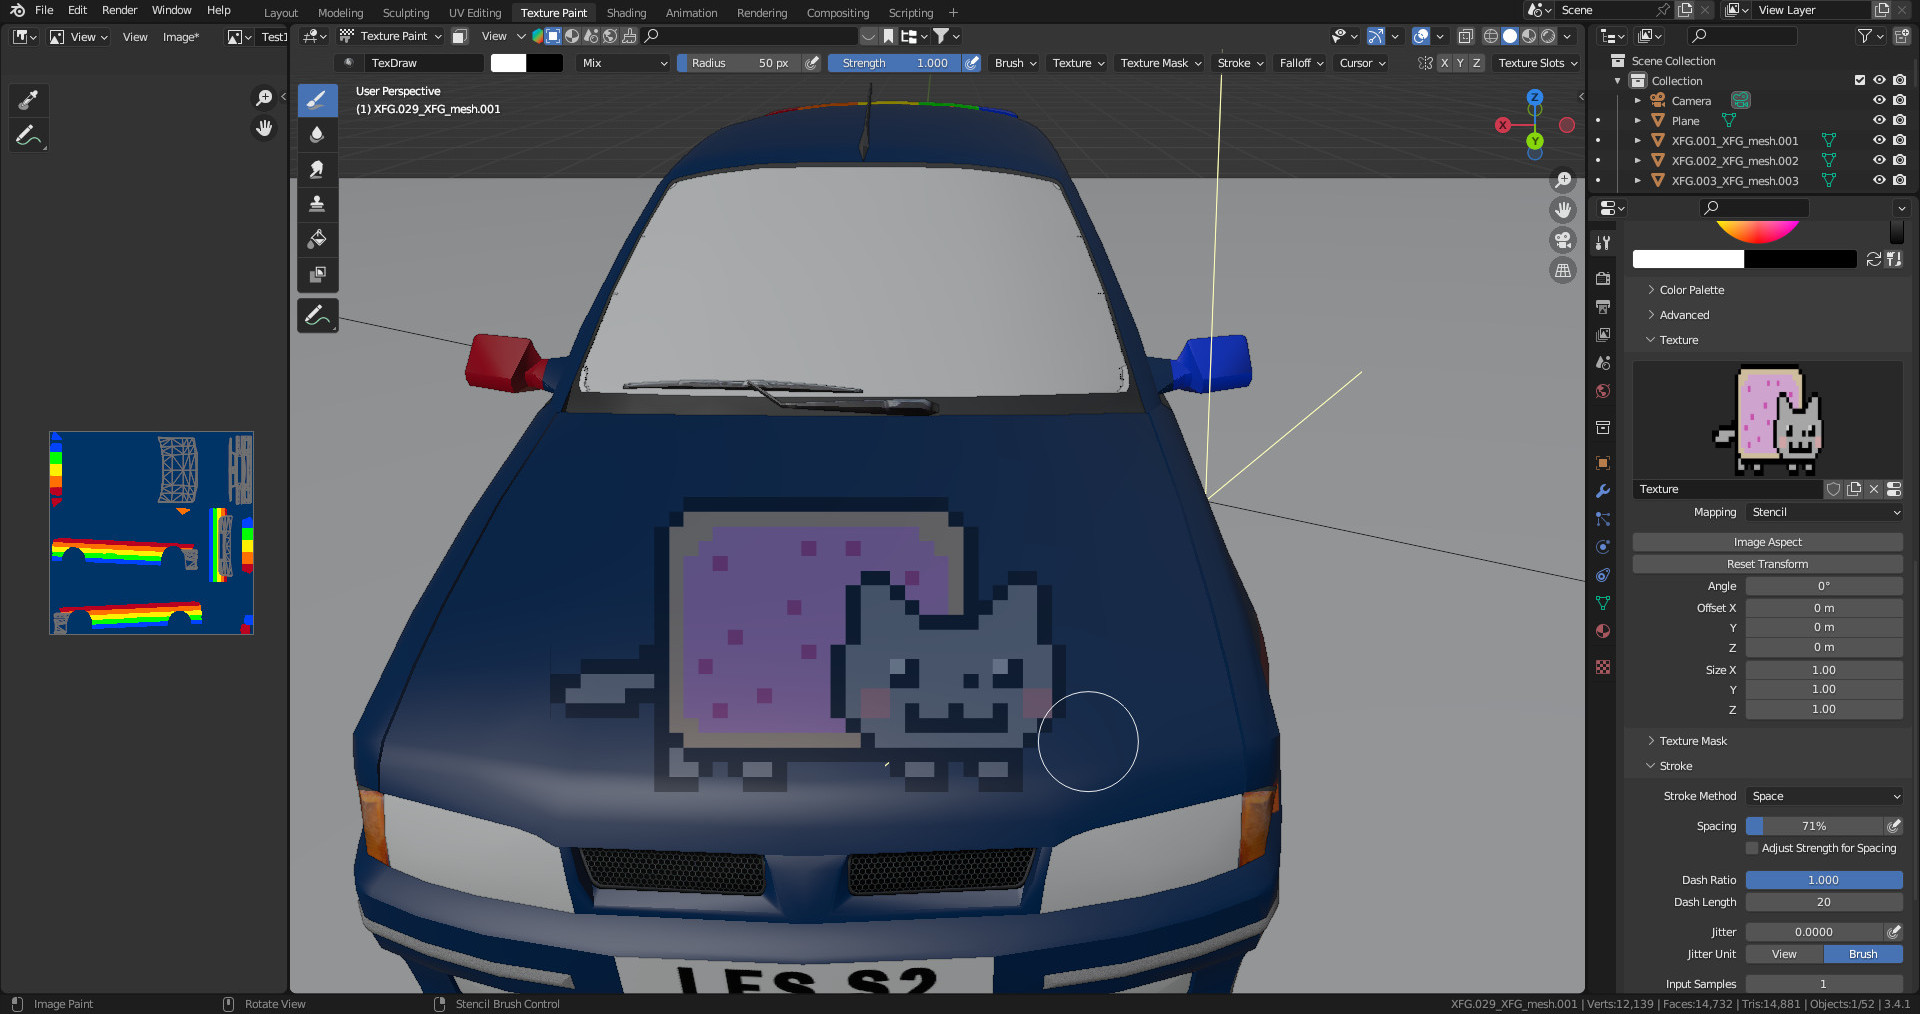
Moving on into the next feature, you've baked your image and now you want it to have stickers. Fair enough, select the image and connect that into the Base Color. Then go to the Texture Paint tab, click New then click Open in the Texture Properties tab in the lateral bar (checkered square). Search for your PNG and after you select it, disable Interpolation. You can paint the sticker now, for better placing go to Active Tool (the first tab in the lateral bar) and change the Mapping to Stencil. This enables you to move the PNG with your mouse, using right click, Ctrl+right click and Shift+ right click. Change the Falloff to Constant for a sharper edge.
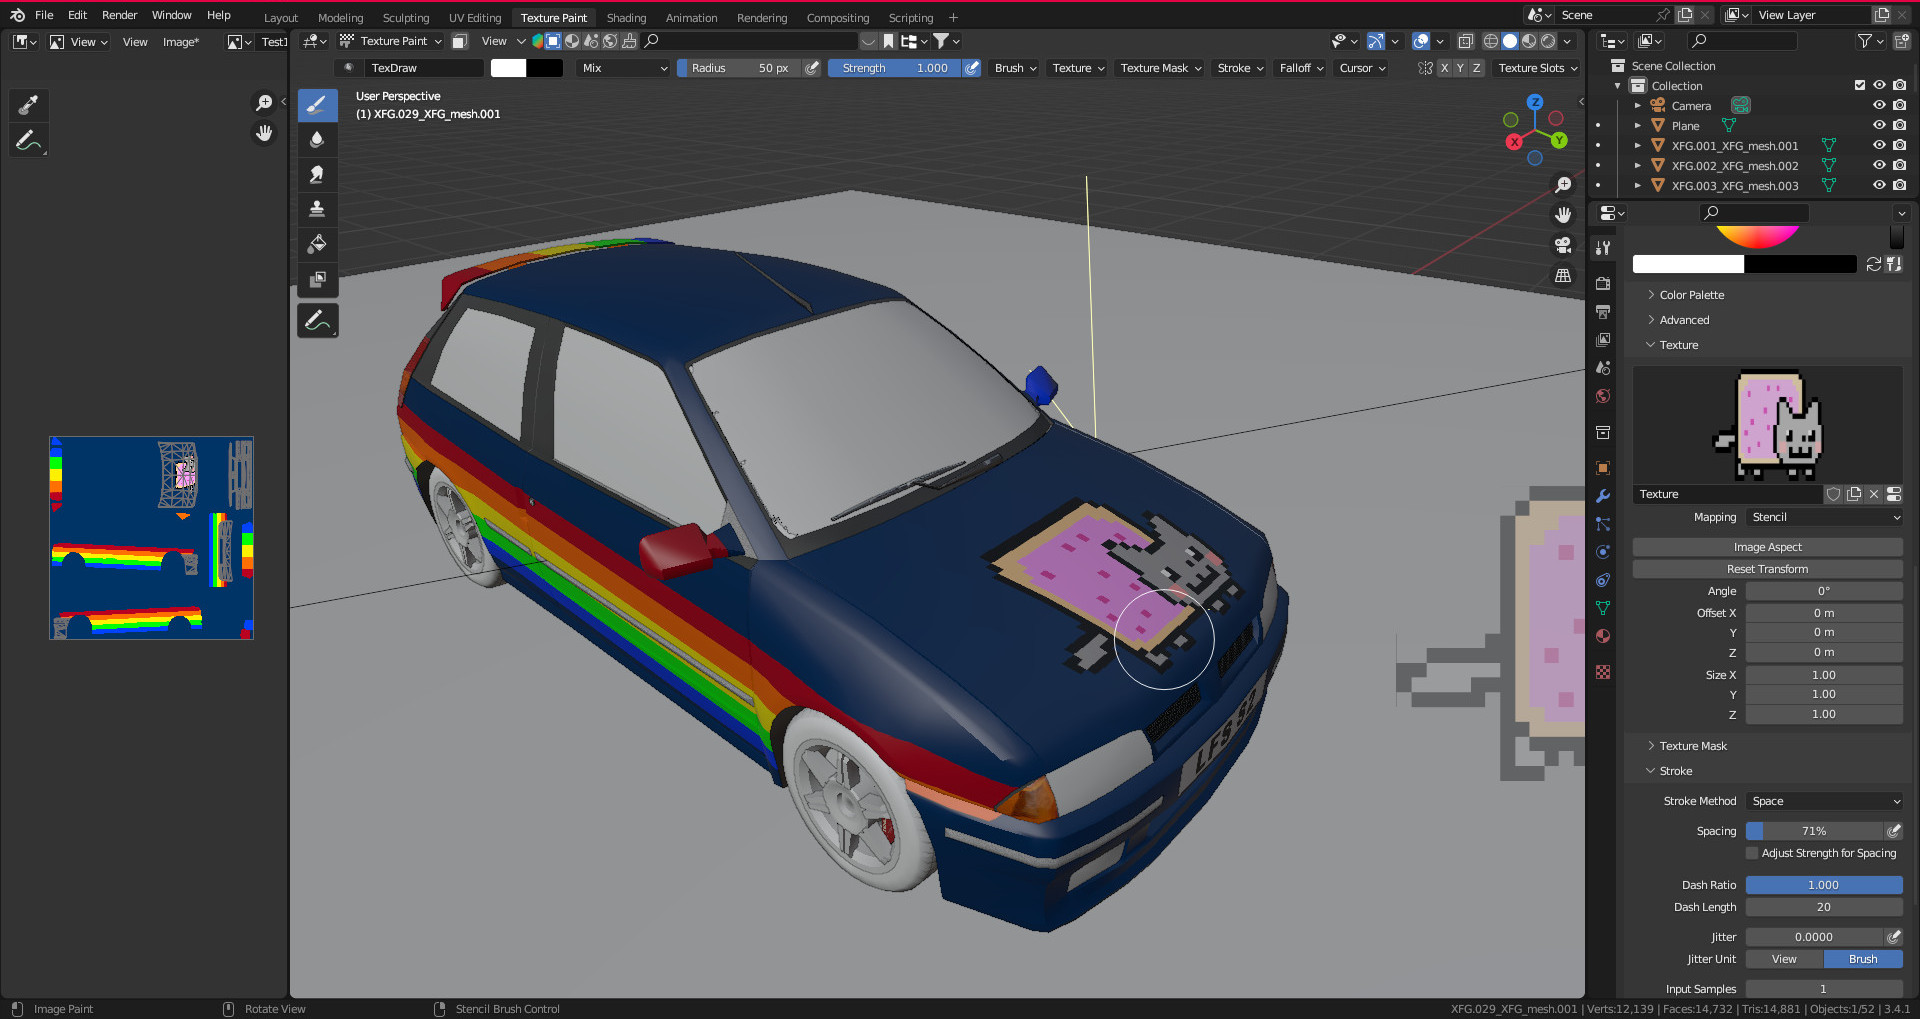
Placing your stickers this way allows you to control the way it looks, in the sense that it changes with the perspective you're placing it with. Putting the camera close and it will look very deformed, put it into Orthographic (numpad 5) and it will look mostly perfect. If the Stencil looks somewhat weird, click Reset Transform and Image Aspect and it should be spot on.
This is the end of my ramblings concerning some of the uses you can bring with this tool. If you're sane after subjecting your eyes to my horrid creations, leave a comment
*Just realized i made a blunder uploading the images , welp here it goes again.
https://www.lfs.net/forum/thread/95307-NEW-Blend-and-OBJ-Files-for-All-LFS-Cars-Updated-v1-2%21
Also there's a video and a post that goes onto some of the stuff i'm doing, credit where credit is due:
https://www.youtube.com/watch?v=HkRlqbFo0SA
https://www.lfs.net/forum/thread/95303-Tutorial%3A-Procedural-skins-using-Blender%21
First and foremost, Blender has a feature which lets you bake textures. Meaning you can make a procedural skin and bake it into an image. This allows you to have a seamless, form fitting texture that you can apply to a multitude of cars.
To make it you will need to have enabled Cycles as a Render Engine (In Render Properties, the camera icon in the lateral bar) Then the Bake section, put Bake Type in Diffuse and check "Color". You don't need Indirect and Direct, but if you want to you can enable them and put an HDRI image for light. This will give you a texture which has shadows and ambient colors, which would look good if the same enviroment aligns in LFS. It wont.
Now, let's say you want for example, a camo skin. Go to the Shader Editor (or Shading tab at the upper bar) and add a Noise Texture, a ColorRamp and connect this to the base color. Change the Noise Texture from Linear to Constant and move the arrow to the middle, if you select the arrow and click it's color at the bottom it allows you to change it. It does look wonky though, to fix it add a Texture Coordinate and a Mapping (in that order) or press Ctrl+T if you have Node Wrangler enabled. Play with the values until it looks good, i recommend having a reference picture to compare it (i didn't and it looks like this). If you want to add more spots, select the previous concoction and duplicate it. Then add a Mix Node, change Float to Color and connect both lines into it, and it into Base color. Shift+A allows you to speed up this whole process.
Few things to note, you CAN change the color in the ColorRamp to be transparent. Then connect the Alpha into the Factor and Mix it that way. Or change from Mix to Multiply, or Overlay, or anything you want. There's multiple ways to reach the same goal, chose the one you prefer.
Also Adding a Snap Node with a value connected to increment makes the camo look digital. Connect it between the Mapping and the Noise Texture.
Great! Let's bake it. Add a Image Node in the Shader Editor and Click New, make your prefered options (1024x1024 should work fine) and keeping the Image Node selected AND the mesh selected. Click the Bake button in Render Properties. Now you should see your texture in Image Editor tab, click the 3 horizontal lines>Image>Save As and you have your texture.
Moving on into a more versatile example. With a Gradient Texture connected the same way (Texture Coordinate>Mapping>Gradient Texture>ColorRamp>Base Color) add a color stop in the ColorRamp, change its color to transparent and move the Arrows until it looks like a stripe. Connect the Alpha wire from the ColorRamp into the Alpha from the PrincipledBSDF and bake it. This image you can Paste as a layer in any image editor and you will have an instant Stripe in any skin.
With the knowledge from the previous example i made this rainbow stripe, placing it is tricky but with trial and error it's feasible. If you want it to only appear in certain panels of the car, i can show you another trick. Go to Edit Mode (Press Tab) deselect everything (Press A twice) and with the mouse over the panels you don't want, press L. Then go to Mesh>Separate>Selection (or press P). You can bake this meshes separately now. Or join them again with Ctrl+J.
Some few uses for the Gradient Texture, change Linear to Radial and you can achieve this. Or change it into Quadratic to achieve this, the limit really is your imagination.
Moving on into the next feature, you've baked your image and now you want it to have stickers. Fair enough, select the image and connect that into the Base Color. Then go to the Texture Paint tab, click New then click Open in the Texture Properties tab in the lateral bar (checkered square). Search for your PNG and after you select it, disable Interpolation. You can paint the sticker now, for better placing go to Active Tool (the first tab in the lateral bar) and change the Mapping to Stencil. This enables you to move the PNG with your mouse, using right click, Ctrl+right click and Shift+ right click. Change the Falloff to Constant for a sharper edge.
Placing your stickers this way allows you to control the way it looks, in the sense that it changes with the perspective you're placing it with. Putting the camera close and it will look very deformed, put it into Orthographic (numpad 5) and it will look mostly perfect. If the Stencil looks somewhat weird, click Reset Transform and Image Aspect and it should be spot on.
This is the end of my ramblings concerning some of the uses you can bring with this tool. If you're sane after subjecting your eyes to my horrid creations, leave a comment
*Just realized i made a blunder uploading the images
, welp here it goes again.