Another car to join the GT2c
hopefully the full GTRs too
did rethink the "roofscoop" question, and came up with this. Somehow more elegant than the previous one I had (this is the exact shape the sharkmouth opening has)
this Editor is so unintuitive.. or probably just 30000% different to how I did car creation for 7 years in AC
 Like can anyone tell me how the suspension thing is supposed to work? In AC you put coordinates for each anchor point... now here I can set lengths, but no anchor points.. I planned on using the rear suspension I developed (with help by people that know what they are actually doing) for my KRB Lotus, Group-C style rear with anti-squat and anti-dive ... but it seems like LFS does not even allow for inclined wishbones..?
Hi, you can change suspension in the "suspension menu" press "s" and on youre right you have different points (vertex /lower pivot/upper pivot and thrust bearing  For the KRT CR, that's a real challenge to create doubble wishbone suspension ^^ so for now that's a linear...
For the KRT CR, that's a real challenge to create doubble wishbone suspension ^^ so for now that's a linear...when I press S I can play Lego with some frame, but there's nothing about suspension
Wow this mod is really getting wings and taking off (no pun intended) love that rear diffuser. Just question those engine specs is that what you want? Peak torque and peak HP all the way at the top of the rev range? Not going to be sluggish during take off?
Engine specs aren't final, but it is my goal to create a car that has different driving characteristics and feel compared to the old GTRs. Wringing ~400 hp out of a smallish V6 will create a narrow powerband, but maybe having that power instantly without turbo spool is advantages in certain situations. Lighter smaller car with more effective aero may yield better braking performance.
in that special draw mode, add a new point on the top right menu and there should be another option to set the point type, set those accordingly to lower/upper pivot and thrust bearings

i guess you can technically set them at an angle with these points, but i'm not sure would that be what you're after.
still, looking forward to driving this
if only people learnt to drive the unrestricted cars which would be closer to "actual" gt2 cars
Have you considered maybe like a Honda J series swap instead those motors are light and without boost they can make 400 Hp and they range from a 3.0, 3.2, 3.5, 3.7L and they can rev up to 8,000 rpms, but they make good torque and great HP built or maybe the Alfa 155 v6 Ti. https://youtu.be/WHjs-pcyg8Q
https://youtu.be/wysO0nj2bMQ
Hej hej, I like where this is going!  I like the fact that you are opting for a peaky N/A screamer with smooth torque and power development through the rev range. Seems to make a lot more sense for a light, compact MR chassis. Also digging the roof scoop BTW!
Regarding the front, I attached an image showing a few things that I had in mind then and now. I hope it's understandable what my mesh-like sketching is trying to illustrate. I think the original design has its headlights as far inside the front/fender area as possible, so it wouldn't make sense to move them, from my understanding. My suggestion was merely a sort of cover or fairing, obviously transparent, to take the edge off, aerodynamically speaking.
However for the brake ducts, you probably want the opposite. Trying to blend an air intake into the shape of the body work creates much more turbulent airflow, than if you have that intake properly stick out. A good example are sub-sonic warbirds: Take a look at german WWII aircraft engine intakes, or the P-51 Mustang's under-belly radiator scoop. I guess for the Raceabout you could leave the stock design and simply take out the lower headlight units to use the remaining pipe shape. The one I drew up would be an alternative, somewhat hybrid version.
Lastly, and I really don't know enough about racecar aero to judge whether it'd be warranted, but anyways I increased the area of the canards. More importantly, the leading edge doesn't fade into them, instead it's perpendicular to the airflow, which is always the most efficient solution for sub-sonic airflow and a given surface area. Efficiency could be further increased with a "fence" on the outer edge, but that might hit polygon count too hard for something that is, for the game's purposes, just a cosmetic detail.
So there you go, more nitpicky fussing about from me.
I like the fact that you are opting for a peaky N/A screamer with smooth torque and power development through the rev range. Seems to make a lot more sense for a light, compact MR chassis. Also digging the roof scoop BTW! Regarding the front, I attached an image showing a few things that I had in mind then and now. I hope it's understandable what my mesh-like sketching is trying to illustrate. I think the original design has its headlights as far inside the front/fender area as possible, so it wouldn't make sense to move them, from my understanding. My suggestion was merely a sort of cover or fairing, obviously transparent, to take the edge off, aerodynamically speaking.
However for the brake ducts, you probably want the opposite. Trying to blend an air intake into the shape of the body work creates much more turbulent airflow, than if you have that intake properly stick out. A good example are sub-sonic warbirds: Take a look at german WWII aircraft engine intakes, or the P-51 Mustang's under-belly radiator scoop. I guess for the Raceabout you could leave the stock design and simply take out the lower headlight units to use the remaining pipe shape. The one I drew up would be an alternative, somewhat hybrid version.
Lastly, and I really don't know enough about racecar aero to judge whether it'd be warranted, but anyways I increased the area of the canards. More importantly, the leading edge doesn't fade into them, instead it's perpendicular to the airflow, which is always the most efficient solution for sub-sonic airflow and a given surface area. Efficiency could be further increased with a "fence" on the outer edge, but that might hit polygon count too hard for something that is, for the game's purposes, just a cosmetic detail.
So there you go, more nitpicky fussing about from me.
yeah I want to keep the "Saab engine" just for giggles, its all fantasy number games anyway, tho going with what I'd have as basis, and what I'd want in the end, the comparison to the 155 TI is probably the most fitting. Take the base engine variant with the biggest stock bore, bore it even wider, reduce the stroke in an effort to keep mean piston speed in a range that everything keeps working at (basically the secret to screaming F1 engines - big bore, tiny stroke), make everything else from exotic expensive metals - boom, high rpm screamer.
Can I make you the 155 engine and see what you think?
I'll probably try that myself first, but thanks for the offer

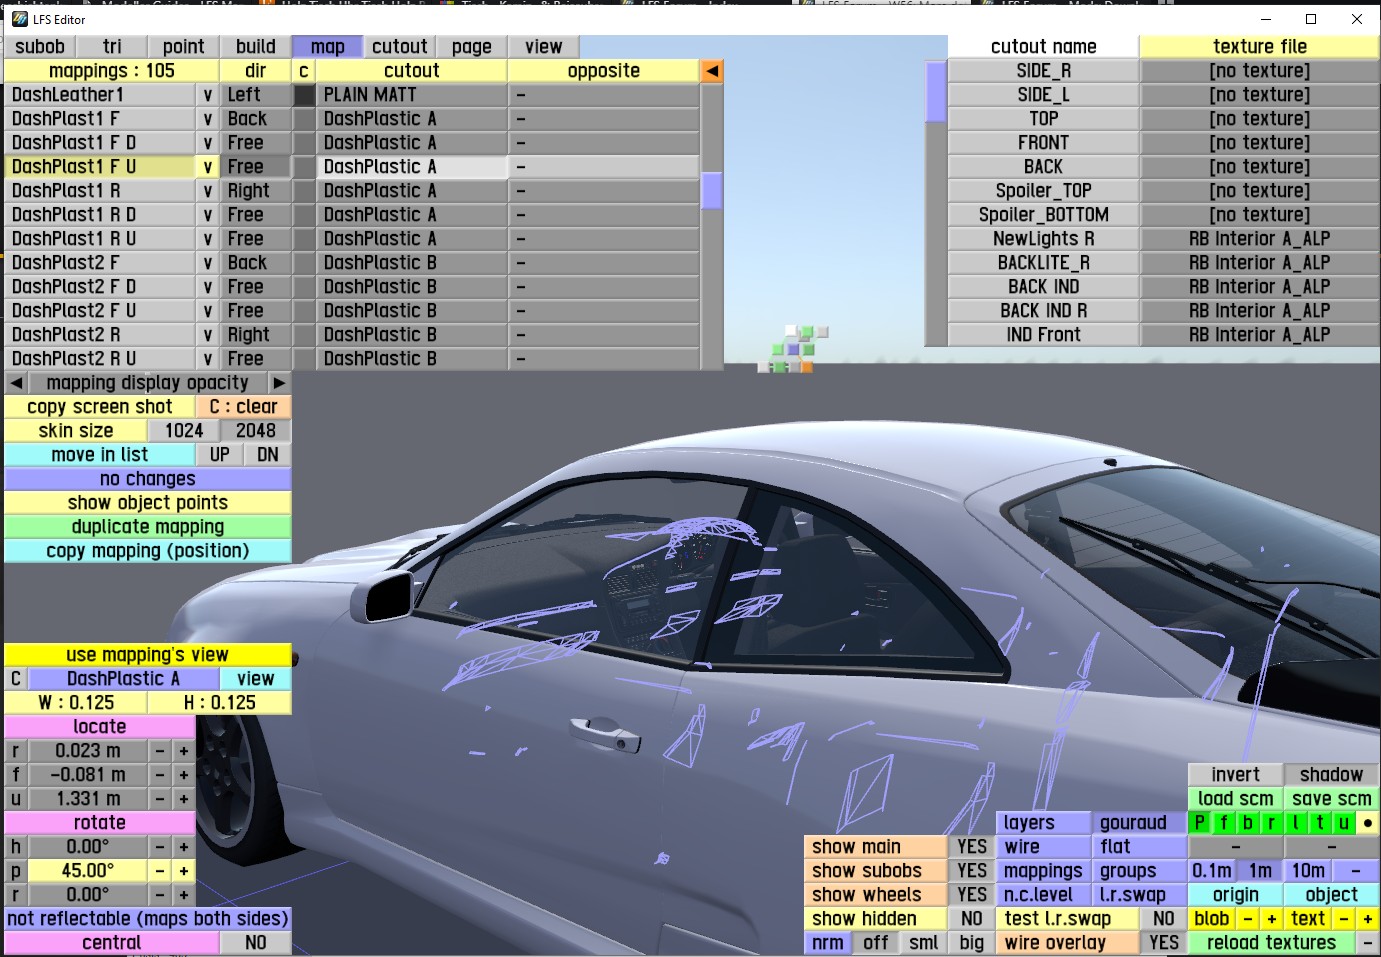
I still can't wrap my head around the Editor, I looked at some of the Kunos cars but really don't understand what I'm seeing. What's a cutout, whats page?
 I tried watching some of Scawens videos but have a hard time following them, plus I only have a single screen here and would be alt-tabbing between both. Maybe I'm just too old.
meanwhile I continued a little of what I understand, modelling
I'll try my best to explain, altough i'm very poor at it and not sure if i got it right either.
To make a new mapping, click the "tri" tab and in the bottom left duplicate the existing mapping and right click on the color box to rename it something else. Then select the triangles you want to have this mapping and left click on the color box to assign them for it.
Mappings can have any name you want, apart from the lights and body color options if necessary. For all of the available lights there are already preset names to choose from when you're renaming the mapping, but for body colors it's commonly M1_x to M4_x(main). to create copies of these colors for other specific places you want to have adjustable color in you can use C1_x to C4_x(copy). If you want only one adjustable color then you only use M1 and C1 mapping for every place, if two separate colors you define the places that'll have the 2nd color option as M2 and C2, and so on.
You will see this mapping on the "mapping" tab after this. It can be assigned a cutout, but as this doesnt exist yet you need to create a new cutout in the "cutout" tab. Click on "add new cutout" and name it whatever you want. You can now assign this cutout for specific mapping back at the mapping tab by clicking on the cutout paragraph and choosing the new cutout from a list on top right. You can also change the material properties in the cutout page by clicking on the material paragraph.
For loading textures into the editor, you have the "page" tab. Each texture is basically a page, and these have to be .png files and located in the editor/data/png folder. When you click on "add new page" you will be greeted by the list of textures that are inside data/png, choose the texture you want and repeat for all the textures you need for your model.
Assign these pages in the cutout tab by clicking on the page paragraph of the corresponding cutout. After that, you can adjust the mapping and positioning of a texture in the "mapping" tab.
---
Back on topic though, i am very biased when i say this but would love to see an engine similar to 155 V6 TI or Honda's C or J engines, instead of the poor excuse of a V6 by GM It is not too much an issue though, i'll propably end up driving this regardless of what engine is in it
To make a new mapping, click the "tri" tab and in the bottom left duplicate the existing mapping and right click on the color box to rename it something else. Then select the triangles you want to have this mapping and left click on the color box to assign them for it.
Mappings can have any name you want, apart from the lights and body color options if necessary. For all of the available lights there are already preset names to choose from when you're renaming the mapping, but for body colors it's commonly M1_x to M4_x(main). to create copies of these colors for other specific places you want to have adjustable color in you can use C1_x to C4_x(copy). If you want only one adjustable color then you only use M1 and C1 mapping for every place, if two separate colors you define the places that'll have the 2nd color option as M2 and C2, and so on.
You will see this mapping on the "mapping" tab after this. It can be assigned a cutout, but as this doesnt exist yet you need to create a new cutout in the "cutout" tab. Click on "add new cutout" and name it whatever you want. You can now assign this cutout for specific mapping back at the mapping tab by clicking on the cutout paragraph and choosing the new cutout from a list on top right. You can also change the material properties in the cutout page by clicking on the material paragraph.
For loading textures into the editor, you have the "page" tab. Each texture is basically a page, and these have to be .png files and located in the editor/data/png folder. When you click on "add new page" you will be greeted by the list of textures that are inside data/png, choose the texture you want and repeat for all the textures you need for your model.
Assign these pages in the cutout tab by clicking on the page paragraph of the corresponding cutout. After that, you can adjust the mapping and positioning of a texture in the "mapping" tab.
---
Back on topic though, i am very biased when i say this but would love to see an engine similar to 155 V6 TI or Honda's C or J engines, instead of the poor excuse of a V6 by GM
It is not too much an issue though, i'll propably end up driving this regardless of what engine is in it 
thanks, this will come in very handy. But I guess I should only do this once the model is finished in Blender, or I'll have to repeat it on every import. Plus I'm still hoping for UV and Material import (..as that really is the industry standard...). Project from view will cause stretch and tear everywhere on every model that is not a perfect cube
ALso much much easier to use space very effective. This is the UV map I made for my KRB Lotus in Blender ofc. No overlapping edges, no excessive stretching.
(the 155 TI V6 was build from the PRV engine, Peugeot-Renault-Volvo. Alfa used it in some models so it was legal to use in the 155, which apparently was like the worst V6 ever made
 In my head "my" engine here was build by a Saab engineer locked into a CNC workshop with blocks of billed aluminium, some buckets of GM parts and lots of coffee)
It won't be possible to import externally created UV maps any time soon. I've thought a bit about this and the only thing I can think of, would be a system to import an OBJ (or similar) as a completed mesh into LFS. It wouldn't be possible to do any editing of such a mesh inside LFS, because LFS simply doesn't store U and V coordinates in the vertices of editor objects. In LFS, any editor vertex in a single location is shared between all the smoothing groups and colours that meet at that point. So it's impossible to conceive of each point storing multiple U and V coordinates.
So, the only thing I can imagine at this point is to load a complete mesh (similar to what I call an "output mesh" - one that is ready to draw) in some format, with all the mappings already done.
But then of course by default all the LFS functions like side swapping, light naming, number plate mapping, live dashboard, lod meshes, would have to be handled somehow. No doubt you'll tell me that is very easy but it's actually not. Because LFS is internally all designed around the editor meshes that are stored in memory. To design an interface to load and use ready-to-draw meshes created by an external program would be a large project. We are hoping to release what we have as an official release in early December. That will not be delayed in order to support a whole new system that LFS was never designed to use, and that I can't focus on, at all, at the current time, with a lot already on my lists of very important things to do.
I do understand that it is hard for someone who is used to a modern, advanced editor to actually get used to LFS editor which has only recently been converted from an in-house development tool, to be a bit more usable for other people. It's not as powerful as the tools you are used to. But the challenge of changing LFS around to be able to work in two completely different ways but remain compatible is just too much at the moment.
yeah I guess I'm known to you as the heckler by now, but no. I don't know anything about coding.
Will probably just have to simplify my "vision" for the car. Or do something else.
Well I hope we don't miss out on your cool looking models! I don't think a RAC should be all that hard to map. I recommend if you have a little time you could have a look at the official RAC in the editor, see how the mappings are done in there. It might be less bad than you think. Though I know it can be overwhelming at first, and that is probably worse when you are used to a more advanced editor.
Depending on how far you have got with the texturing, it might be possible to use the mappings from the existing LFS model.
The process for that would be something like:
- Save model from the LFS RAC vehicle as a .sre file
- Save your model as a .sre file
- Load the RAC saved model into your vehicle
- Delete points and triangles from LOD1 of this loaded original RAC model
- Add a blank subobject
- Load your own saved model into that subobject
- Merge that subobject into the main mesh
By this method, all the mappings from the original RAC are in there and it would be a matter of assigning triangles to the correct mappings.
Or another completely different approach, if a lot of your main bodywork is still the same as the original RAC:
1) Get your model, and delete the original RAC bodywork, so leaving your wings, aero elements, cage, roof. All the stuff you have modelled and want to keep. Save this as an object.
2) Load the LFS RAC.
3) Delete everything you don't want from there, leaving most of the main bodywork. Now you still have fully mapped RAC bodywork.
4) Add an empty subobject.
5) Load your saved model (aero, cage, roof, etc) as a subobject.
6) Position it correctly
7) Merge into main.
Another different approach is to save individual parts of your mesh as subobjects. These may be loaded into a RAC mesh and you might want to leave some of them as subobjects. E.g. a rear wing might be suitable for this, but probably not the roof.
I don't know if this is similar to any methods you are used to but thought I'd pass on a few approaches that seem to make some kind of sense with the LFS editor.
that's probably the biggest thing
getting my first car working in AC took many months, and then I stayed in that environment for many many years... now it been barely two weeks with this whole new development here of which I spent one away from any computer. Much to "unlearn". Overall I don't want to sound ungrateful but may just be my (english) writing style.I'll keep at it, thanks for the replies

I somehow managed to get the car into the game. This is an old import of the model missing the roof scoop, engine detail and rear lights etc. But it's got new rear suspension. How can I add aero to the car? The buttons are blue and can't be changed.
New subobject - object type: front wing or rear wing - that will set the aero centre for each wing.
Looks fast, stable and with good suspension movement! Keep up the great work!
it actually was none of that lol, that was, except the rear suspension, just the stock RAC suspension setup. I'm on a Simucube wheel here, so I can correct spins very fast if needed lol I also made the error of changing the export name, so for a few hours I was tinkering with the suspension and wondering why none of it made the car better.. I was loading the wrong version the whole time.
I've since redone the front too, again adopting a well working layout from my AC Lotus build. The car is still very twitchy especially under braking. I'm thinking if I should try releasing it earlier to enable other users to test it, as my goal is making a car that is usable with the stock GTRs, and I can hardly do that on my own.
...and next to that I started a 100% fantasy build of yet another GTR.. like the polar opposite of the RaceAbout... I combined a Japanese, a French and a Swedish car for its appearance, V10 TT powered

Driving over inside kerbs was a bit scary when I was quickly testing the car on mouse, tho setup changes helped slightly  Need to do some more proper testing on wheel.
Need to do some more proper testing on wheel.I'm not sure if I continue with this. For one, it doesn't seem like anyone likes this car, and the biggest issue, mapping everything once the model is finished.. I just took a closer look at the new RB4, especially its dash texture, as that is on first glance reasonably close to what I would want with my interior and dash.
Tiled carbon fibre.
Simple.
In a normal modeller tool its a matter of setting a few sensible seams during the modelling process, than clicking a single button, adjust scale, done. 5 minutes of extra work.
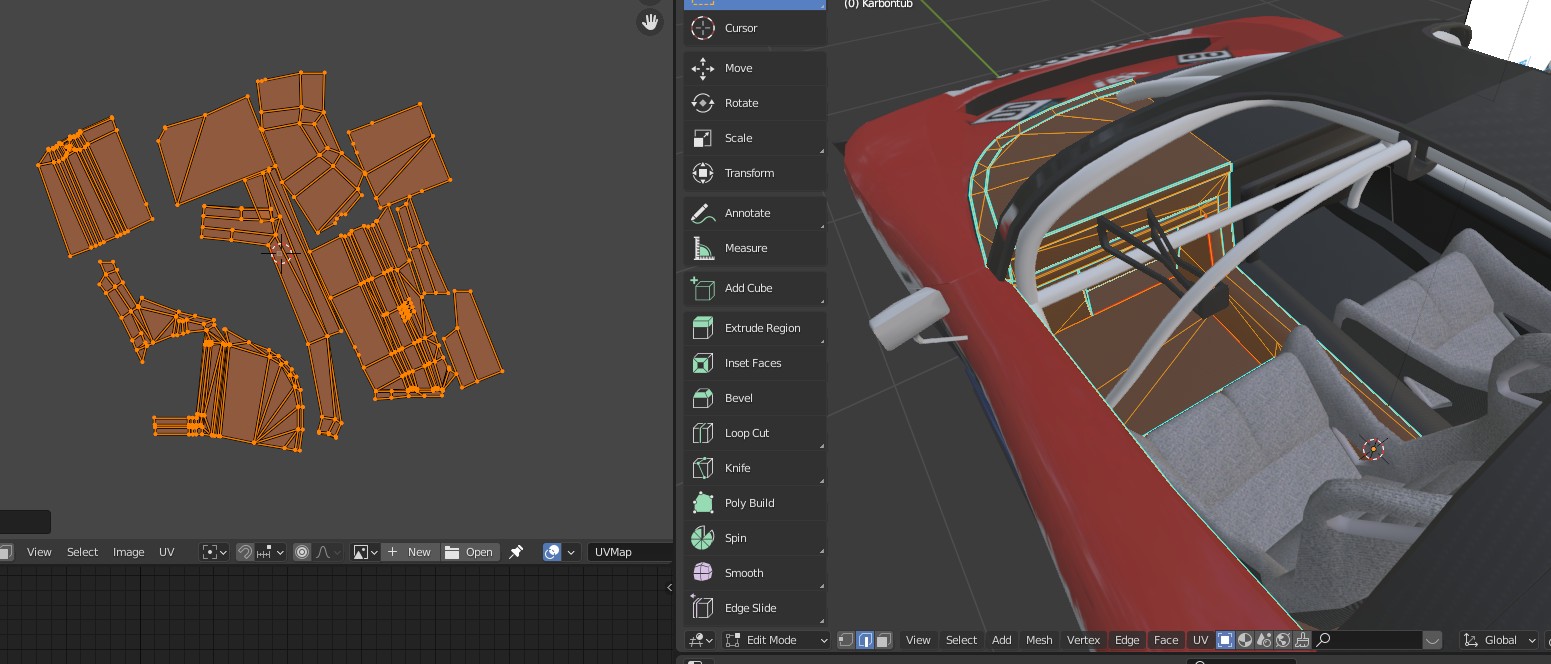
It appears that to make something resembling this in the LFS Editor, I'd need to make like a dozen "cameras", then hand select each individual triangle fitting to its orientation, do this for all triangles (lucky me, currently its just 860), than go about adjusting the whole dozen mappings by size till all have the same scale
That's beside the fact that this forbids external AO baking, or for example high res to low res baking, which for these low poly, high efficiency models would be a very welcomed feature.
It's like telling me to light up a camp fire, letting me stack the wood up high, then taking my matches away to instead send me into the woods to fashion a fire bow. I don't get, yes it was explained to me why and how the whole system was done like this, I still don't get it as whatever gets handed to the GPU will be in this UV format. I've done modelling for a few different game engines so far, and none of these threw away imported UVs.
I'm just venting here and don't need answers.
Tiled carbon fibre.
Simple.
In a normal modeller tool its a matter of setting a few sensible seams during the modelling process, than clicking a single button, adjust scale, done. 5 minutes of extra work.
It appears that to make something resembling this in the LFS Editor, I'd need to make like a dozen "cameras", then hand select each individual triangle fitting to its orientation, do this for all triangles (lucky me, currently its just 860), than go about adjusting the whole dozen mappings by size till all have the same scale
That's beside the fact that this forbids external AO baking, or for example high res to low res baking, which for these low poly, high efficiency models would be a very welcomed feature.
It's like telling me to light up a camp fire, letting me stack the wood up high, then taking my matches away to instead send me into the woods to fashion a fire bow. I don't get, yes it was explained to me why and how the whole system was done like this, I still don't get it as whatever gets handed to the GPU will be in this UV format. I've done modelling for a few different game engines so far, and none of these threw away imported UVs.
I'm just venting here and don't need answers.
RaceAbout GTR / RaceAbout Attack (stopped)
(58 posts, started )
FGED GREDG RDFGDR GSFDG