This guide is for making Basic to Advanced buttons.
Some Button code has already been topics on the LFSLapper section of the LFS Forum. See –
Basic Button code
https://www.lfs.net/forum/thread/89097-Buttons---Learn-how-to-use-them---Basics-%28Long-post%29
Advanced Button Making - Escape Codes and symbol Glyphs
https://www.lfs.net/forum/thread/89157-Buttons---Learn-how-to-use-them---Advanced-%28Symbols-Glyphs%29
Documentation for making basic buttons is included within each version of LFSLapper. If you look through the code, you will also see other more complicated code for both Private and Global buttons.
Private just means only the person looking at their screen when a specifc set of circumstances occur - normall an Event - such as when you spec, etc.
Global just means that when something happens, or an Admin triggers it, everyone will see the same button.
Along with this guide, I've included the code I've used to make be image below.
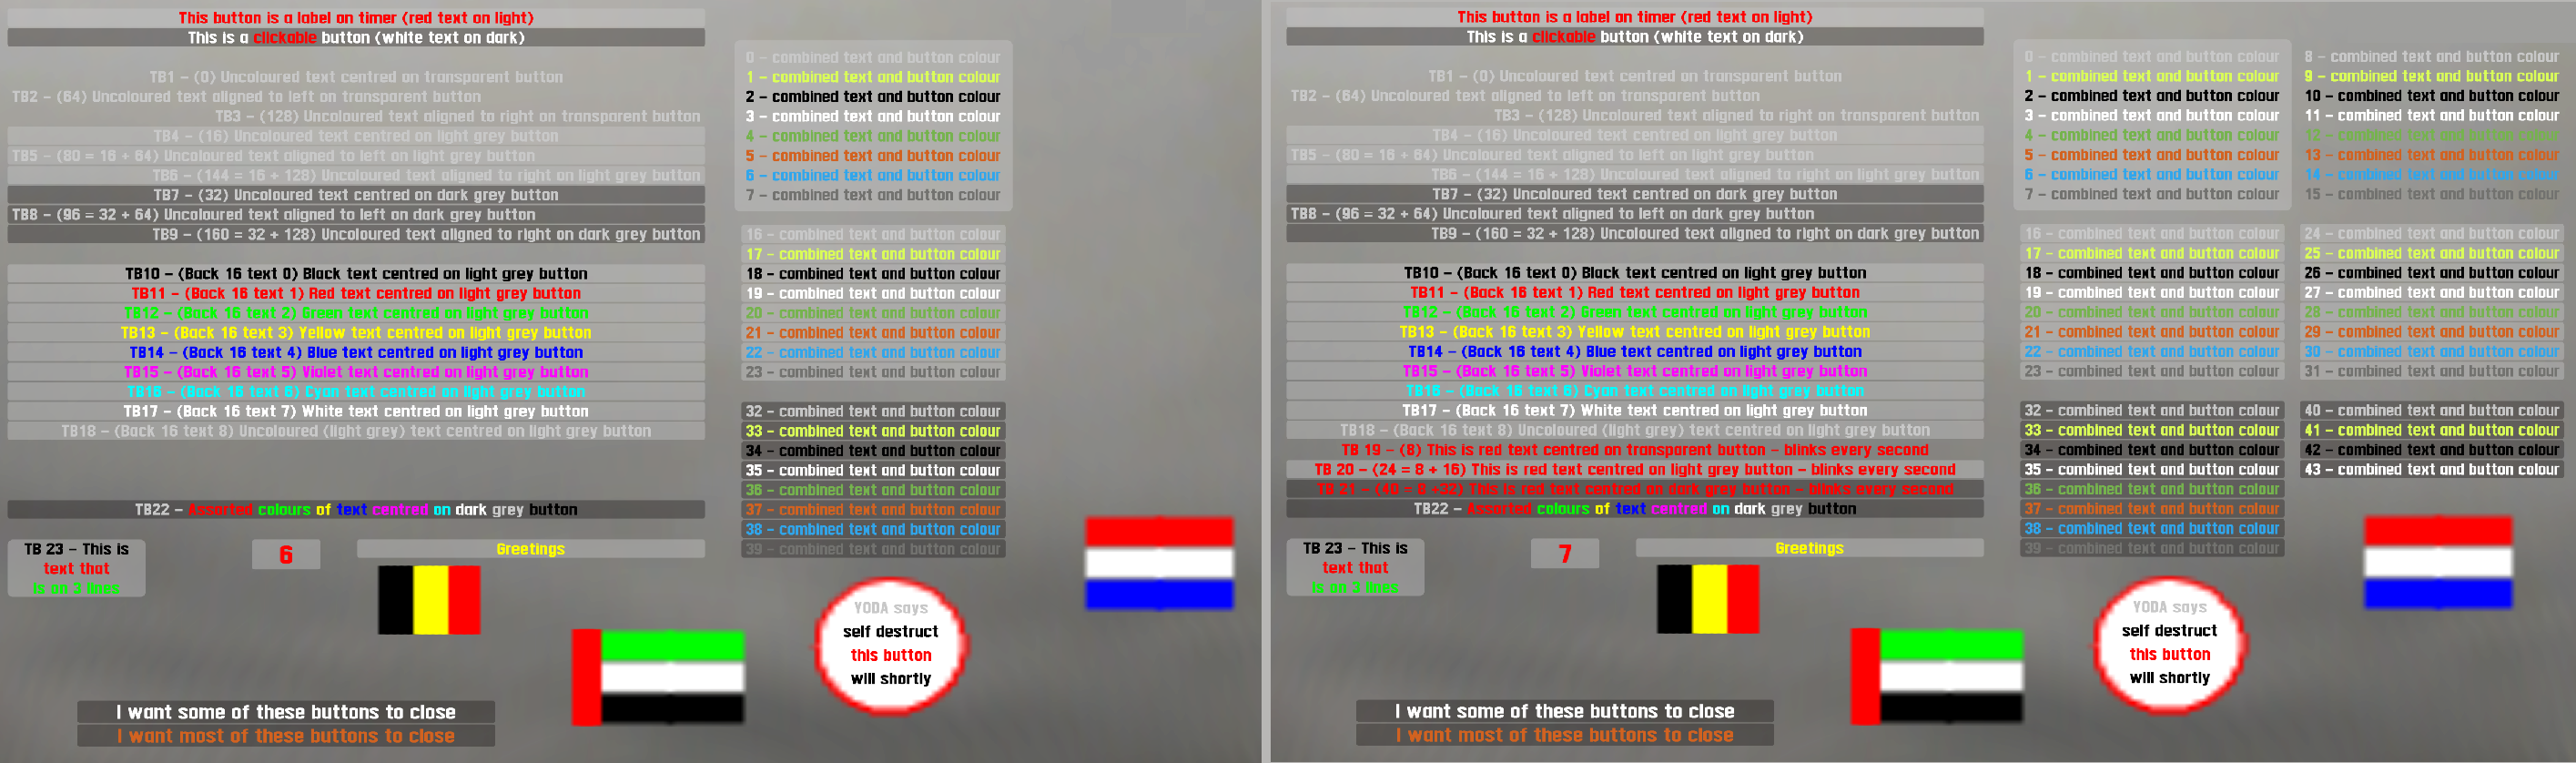
Left side shows screen when blinking buttons were off, and right side when they reappeared.
This guide is a shortened version of the attached pdf, which has lot more detail. I didn't want to put it all in this post, as it comes to 7 pages.
Hopefully, if you download it, should be easy enough to read, and make sense.
=====================================================================================================
When it comes to (documented or not) button backgrounds, and text, you can have, or make;
In the image (where TB = Test Button), and attached example code, you will see that some of the buttons are transparent, and some are either light grey, or dark grey.
TB1, TB4 and TB7 show uncoloured (light grey) text, centred on a transparent, a light grey and a dark grey button.
TB2, TB5 and TB8 show uncoloured (light grey) text, aligned left on a transparent, a light grey and a dark grey button.
TB3, TB6 and TB9 show uncoloured (light grey) text, aligned right on a transparent, a light grey and a dark grey button.
TB10 to TB18 show all the standard text colours centred on a light grey button.
TB19, TB20 and TB21 show centred red text on transparent, light grey and dark grey buttons, but the buttons blink off and on every second.
TB22 shows standard dark grey button, but with various colours of text
TB23 shows a button that has text on 3 lines - this need %nl% withing the text section of button to show where the line breaks occur
TB24 (not shown on button, but is grey square button with red number to right of TB23 button with 3 lines) is a countdown button.
TB25 – “Greetings” button. The text on this button can be translated. You will need at least one Translation section otherwise you will get errors. This section is normally placed at bottom of any scripts.
Using Vars in place of numbers
Instead of putting a button starts at 10, you can put a var in where $BS = 10 (Button Starts at 10 out of 200).
Vars are handy when you have a set of buttons that go together. For instance, you can have a var that sets a button at 20 (eg $BD = 20( down from top, then your 1st button might have $BD as vertical placement, but your next button would have $BD+5 if your other button was 5 high.
This means that if you want to move everything, and keep everything together, you only have to change the var rather than everybutton, and risk moving them wrongly.
Non standard code
All the buttons above the circular and Dutch flag, are not documented (and probably not many will know) and are made by combing the button and text colours together where you would put button colour code, and not putting text colour in front of the text that you want to display.
Buttons 1, 9, 17, 25, 33 and 45, are all Yellow text on different coloured buttons, some of which blink. But in none of these buttons have I put the colour number for Yellow in the button text field. The number 9 is only to show me number I used to get that particular button style.
Button 9;
openPrivButton ("2ndtest_buttons9",$HFR+40,$HFD+5,$BRW,$BRHS,$TBS,$TBT,9,"9 - combined text and button colour");
The 9 in the code equates to blinking clear button with yellow text, whereas 17 would be yellow text on light grey button.
Flags
As you can see on the screen shot, there are 3 flags.
These are made from transparent buttons that have coloured symbols on them (in place of text).
The code for this flag has text of horizontal lines on 3 lines, each with it’s own colour.
What makes this work is that the size of the text on the button is 90, which is huge considering most button text is usually 4, 5 or 6 high.
Other Shapes
If you want to see more flags, I made a video that you can find on YouTube –
https://www.youtube.com/watch?v=UCm36TlU6uY
Everything on screen, excluding the car, track and LFS timer in top right corner, are buttons; Yisc[NL]’s pitboard, flags, messages, speedtrap, etc.
You will see that there is a circular button … ‘Yoda says’.
This is one that I use for my circular drift scorer. When I first made this, I actually used it with countdown numbers.
Like the flags, it’s just symbols that have been blown up to a huge size.
If you want to see more symbols used to make road traffic signs, you can watch video I made –
https://www.youtube.com/watch?v=WjsdywOmz7E
Taken all together, this whole guide may seem quite daunting, but as I’ve attached all the code for my examples, and because I’ve tried to break it down into sections, should make things slightly easier to manage. At least, that’s my hope.
Anyway, hope the guide helps, and maybe even gives you some ideas on what you can accomplish, without knowing any very complicated code.
Some Button code has already been topics on the LFSLapper section of the LFS Forum. See –
Basic Button code
https://www.lfs.net/forum/thread/89097-Buttons---Learn-how-to-use-them---Basics-%28Long-post%29
Advanced Button Making - Escape Codes and symbol Glyphs
https://www.lfs.net/forum/thread/89157-Buttons---Learn-how-to-use-them---Advanced-%28Symbols-Glyphs%29
Documentation for making basic buttons is included within each version of LFSLapper. If you look through the code, you will also see other more complicated code for both Private and Global buttons.
Private just means only the person looking at their screen when a specifc set of circumstances occur - normall an Event - such as when you spec, etc.
Global just means that when something happens, or an Admin triggers it, everyone will see the same button.
Along with this guide, I've included the code I've used to make be image below.
Left side shows screen when blinking buttons were off, and right side when they reappeared.
This guide is a shortened version of the attached pdf, which has lot more detail. I didn't want to put it all in this post, as it comes to 7 pages.
Hopefully, if you download it, should be easy enough to read, and make sense.
=====================================================================================================
When it comes to (documented or not) button backgrounds, and text, you can have, or make;
- As standard, transparent, light grey, or dark grey buttons
- Combine codes to make new code to align text on coloured buttons, e.g. to make a light coloured button with text aligned to the left, combine the existing codes (16+64) to one new code 80
- For standard buttons, you can replace numbers for the colour and justification with ISB_ code, where ISB_LIGHT - light button (in place of 16), and ISB_LIGHT|ISB_LEFT (in place of 80) to align text left on light grey button
- Coloured buttons – Square, oblong or circular transparent buttons with oversized coloured text lines or symbols (not normal, but I’ve used this for making flags, and things, but sometimes difficult to overlay text on top)
- As standard, 9 colours of text. One is specified as ‘no colour’, which you might assume is clear, but it’s light grey
- Justification of text. Unless specified Left or Right, it will be centred
- Text on more than single line. No need to try match buttons one above other, just use %nl% where you want a (new line) line break. Button will increase depth to incorporate all lines of text
- Blinking / flashing text and button. Both text and button flash together. If you don’t want to see a flashing button, only flashing text, you can use coloured text on transparent button, overlaid onto coloured background button. Both text and button blink on/off together – per second, if no time specified.
- Language translation [e.g. (langEngine( "%{message}%" ) );] You will need a language section, placed at end of your script
- Timer text - openPrivButton( "countdown_button",95,137,10,8,1,10,16,"^1%cpt%"); # Countdown from 10 in seconds
- Combined colour text and button colour without specifying either button or text colour as you would in normal button code (some of the text colours only available with this combined code) but a combined number in colour button place, and no text colour specified in the button text.
- Combining text to make single string of text, cutting text string down in length and changing Upper to Lower case, and vice versa
- Using text in an array
In the image (where TB = Test Button), and attached example code, you will see that some of the buttons are transparent, and some are either light grey, or dark grey.
TB1, TB4 and TB7 show uncoloured (light grey) text, centred on a transparent, a light grey and a dark grey button.
TB2, TB5 and TB8 show uncoloured (light grey) text, aligned left on a transparent, a light grey and a dark grey button.
TB3, TB6 and TB9 show uncoloured (light grey) text, aligned right on a transparent, a light grey and a dark grey button.
TB10 to TB18 show all the standard text colours centred on a light grey button.
TB19, TB20 and TB21 show centred red text on transparent, light grey and dark grey buttons, but the buttons blink off and on every second.
TB22 shows standard dark grey button, but with various colours of text
TB23 shows a button that has text on 3 lines - this need %nl% withing the text section of button to show where the line breaks occur
TB24 (not shown on button, but is grey square button with red number to right of TB23 button with 3 lines) is a countdown button.
TB25 – “Greetings” button. The text on this button can be translated. You will need at least one Translation section otherwise you will get errors. This section is normally placed at bottom of any scripts.
Using Vars in place of numbers
Instead of putting a button starts at 10, you can put a var in where $BS = 10 (Button Starts at 10 out of 200).
Vars are handy when you have a set of buttons that go together. For instance, you can have a var that sets a button at 20 (eg $BD = 20( down from top, then your 1st button might have $BD as vertical placement, but your next button would have $BD+5 if your other button was 5 high.
This means that if you want to move everything, and keep everything together, you only have to change the var rather than everybutton, and risk moving them wrongly.
Non standard code
All the buttons above the circular and Dutch flag, are not documented (and probably not many will know) and are made by combing the button and text colours together where you would put button colour code, and not putting text colour in front of the text that you want to display.
Buttons 1, 9, 17, 25, 33 and 45, are all Yellow text on different coloured buttons, some of which blink. But in none of these buttons have I put the colour number for Yellow in the button text field. The number 9 is only to show me number I used to get that particular button style.
Button 9;
openPrivButton ("2ndtest_buttons9",$HFR+40,$HFD+5,$BRW,$BRHS,$TBS,$TBT,9,"9 - combined text and button colour");
The 9 in the code equates to blinking clear button with yellow text, whereas 17 would be yellow text on light grey button.
Flags
As you can see on the screen shot, there are 3 flags.
These are made from transparent buttons that have coloured symbols on them (in place of text).
The code for this flag has text of horizontal lines on 3 lines, each with it’s own colour.
What makes this work is that the size of the text on the button is 90, which is huge considering most button text is usually 4, 5 or 6 high.
Other Shapes
If you want to see more flags, I made a video that you can find on YouTube –
https://www.youtube.com/watch?v=UCm36TlU6uY
Everything on screen, excluding the car, track and LFS timer in top right corner, are buttons; Yisc[NL]’s pitboard, flags, messages, speedtrap, etc.
You will see that there is a circular button … ‘Yoda says’.
This is one that I use for my circular drift scorer. When I first made this, I actually used it with countdown numbers.
Like the flags, it’s just symbols that have been blown up to a huge size.
If you want to see more symbols used to make road traffic signs, you can watch video I made –
https://www.youtube.com/watch?v=WjsdywOmz7E
Taken all together, this whole guide may seem quite daunting, but as I’ve attached all the code for my examples, and because I’ve tried to break it down into sections, should make things slightly easier to manage. At least, that’s my hope.
Anyway, hope the guide helps, and maybe even gives you some ideas on what you can accomplish, without knowing any very complicated code.